In this sample chapter from Containers in Cisco IOS-XE, IOS-XR, and NX-OS: Orchestration and Operation, you will explore the key built-in capabilities that enable application hosting and containers in Nexus switching platforms.
In this chapter, you will learn the following:
Cisco NX-OS architecture—key characteristics and benefits
Environment readiness to host containers and applications
Container infrastructure instantiation, network and access configuration, orchestration and application hosting—LXC-based Guest Shell, Bash, Docker and LXC-based Open Agent Container.
Cisco NX-OS Software Architecture
Cisco NX-OS is designed to meet the needs of modern data centers, which demand products, applications, and services that are high performance, highly available, resilient, secure, scalable, and modular in architecture. These criteria are met by all the platforms—Nexus 3000, 5000, 6000, 7000, and 9000—that support and run Cisco NX-OS. These characteristics provide the solid foundation of resilience and robustness necessary for network device OSes powering the mission-critical environment of today’s enterprise-class data centers.
NX-OS Foundation
Cisco NX-OS finds its roots in the Cisco SAN-OS operating system used in lossless SAN networks. As a direct result of having been deployed and evolving from nearly a decade in the extremely critical storage area networking space, NX-OS can deliver the performance, reliability, and lifecycle expected in the data center.
Cisco NX-OS is built on a Linux kernel. By using Linux kernel as its foundation, Cisco NX-OS has the following characteristics and benefits:
An open-source and community development model, which leads to real-world field testing and rapid defect identification and resolution
Proven stability and maturity, with advanced capabilities
A near-real-time OS kernel, which is suitable to scale real-time applications
An architecture leveraging multiple run-queues for handling multicore and multiple-CPU system configurations
A multithreaded, preemptive multitasking capability that provides protected fair access to kernel and CPU resources because it employs a highly scalable processor queue and process-management architecture
These characteristics and benefits ensure system stability and fair access to the system resources for software functions such as routing protocols, the spanning tree, and internal services and processes. By its inherent nature, NX-OS supports multiprocessor and multicore hardware platforms, which help to simplify scalability by supporting not only current hardware or software features but also future software features.
NX-OS Modular Software Architecture
NX-OS software components are modular and built on top of the Linux kernel, as illustrated in Figure 7-1. These modular components can be described as such:
Hardware drivers, which are hardware-related and highly dependent on the platform
Infrastructure modules to manage the system
Software features or control-plane functions
)
Figure 7-1 NX-OS Software Architecture
The platform-dependent modules consist of hardware-related subsystems, such as hardware and chipset drivers specific to a particular hardware model on which Cisco NX-OS runs. These modules typically provide standardized APIs and messaging capabilities to upper-layer subsystems. The modules essentially constitute a hardware abstraction layer to enable consistent development at higher layers in the OS, improving overall OS portability. The code base for these hardware-dependent modules reduces the overall code that needs to be ported to support future NX-OS releases and for other hardware platforms.
The Netstack module runs in user space and is a complete TCP/IP stack with components L2 Packet Manager, ARP, Adjacency Manager, IPv4, Internet Control Message Protocol v4 (ICMPv4), IPv6, ICMPv6, TCP/UDP, and socket library. The Netstack is built and used to handle the traffic sent to and from the CPU. A user can debug Netstack to uncover the process(es) that are triggering a high CPU utilization condition.
The system infrastructure modules such as management infrastructure and high-availability infrastructure provide essential base system services that enable process management, fault detection and recovery, and interservice communication. High-availability infrastructure provides subsecond recovery of a fault, enabling stateful recovery of a process. During the recovery, it preserves the runtime state of the feature, increasing the overall network and services availability. The Persistent Storage System (PSS) and Message Transmission Services (MTS), the core parts of the high-availability infrastructure, enable the subsecond recovery of a fault, resulting in overall higher system uptime.
The feature modules consist of the actual underlying services responsible for delivering a feature or running a protocol at the control plane level. Open Shortest Path First (OSPF), Border Gateway Protocol (BGP), Spanning Tree Protocol, Overlay Transport Virtualization (OTV), and NetFlow export are all examples of modularized system-level features or protocols. Each feature is implemented as an independent, memory-protected process that is spawned as needed based on the overall system configuration.
This approach differs from that of legacy network operating systems in that only the specific features that are configured are automatically loaded and started. This highly granular approach to modularity enables benefits such as these:
Compartmentalization of fault domains, resulting in overall system resiliency and stability
Simplified portability for cross-platform consistency
More efficient defect isolation, resulting in rapid defect resolution
Easy integration of new feature modules into the OS
Support of conditional services, resulting in efficient use of memory, CPU and CLI resources, and improved security as lesser OS functions are exposed
Fault Detection and Recovery
In addition to the resiliency gained from architectural improvements, Cisco NX-OS provides internal hierarchical and multilayered system fault detection and recovery mechanisms. No software system is completely immune to problems, so it is important to have an effective strategy for detecting and recovering from faults quickly, with as little effect as possible. Cisco NX-OS is designed from the start to provide this capability.
Individual service and feature processes are monitored and managed by the Cisco NX-OS System Manager, an intelligent monitoring service with integrated high-availability logic. The system manager can detect and correct a failure or lockup of any feature service within the system. The system manager is, in turn, monitored and managed for health by the Cisco NX-OS kernel. A specialized portion of the kernel is designed to detect failures and lockups of the Cisco NX-OS System Manager. The kernel itself is monitored through hardware. A hardware process constantly monitors the kernel health and activity. Any fault, failure, or lockup at the kernel level is detected by hardware and triggers a supervisor switchover. Figure 7-2 illustrates the components involved in the fault detection and recovery process.
)
Figure 7-2 NX-OS Fault Detection and Recovery
The combination of these multilevel detection and health monitoring systems creates a robust and resilient operating environment that can reduce the overall effect of internal faults and, more importantly, preserve the stability of the overall network by internalizing these types of events.
More Benefits of NX-OS
Following are some of the key but nonexhaustive benefits that this chapter will briefly discuss:
Familiar usability and operation: Cisco NX-OS maintains the familiarity of the Cisco IOS CLI. Users comfortable with the Cisco IOS CLI will find themselves equally comfortable with Cisco NX-OS, which has numerous user interface enhancements.
Virtualization capability: Cisco NX-OS offers the capability to virtualize the platform on which it is running. Using Cisco NX-OS virtual device contexts (VDCs), a single physical device can be virtualized into many logical devices, each operating independently. And it supports virtualization of overlay transport, which addresses the need to scale Layer 2 by extending the domain across different data centers.
Enhanced security: NX-OS supports features and tools to secure the platform and its functions. Some of the more advanced security features supported are Cisco TrustSec (CTS), IP Source Guard, DHCP snooping, Unicast Reverse Path Forwarding (uRPF), access control lists (ACLs), and 802.1x.
Unified I/O and unified fabric: Cisco Unified Fabric includes the flexibility to run Fiber Channel; IP-based storage, such as network-attached storage (NAS) and Small Computer System Interface over IP (iSCSI), or FCoE; or a combination of these technologies on a converged network.
Support of standalone fabric: NX-OS supports features to build standalone fabrics such as FabricPath, Dynamic Fabric Automation (DFA), and VXLAN/EVPN to scale the Layer 2 domains and meet the demands of today’s virtualized computing environments and applications.
Advanced system management: NX-OS supports SNMP (v1, v2c, and v3) to enable traditional ways of managing systems. NETCONF and XML are integrated to NX-OS, which make it IETF-compliant to transact XML through secure connections. With the support of configuration checkpoint and rollback, managing devices through its software lifecycle is easier.
Hosting Environment Readiness
This section discusses the various shells and containers supported in Nexus switching platforms and the OS version and resources required to support them.
Guest Shell
Guest Shell is an execution environment isolated from the host operating system’s kernel space and running within a Linux Container (LXC). As with OAC, having a decoupled execution space allows customization of the Linux environment to suit the needs of the applications without affecting the host system or applications running in other Linux Containers.
Platforms Support
Guest Shell is supported in Nexus 3000/9000 platforms. Table 7-1 provides the minimum NX-OS version required for each platform to run the Guest Shell environment.
Table 7-1 Nexus Switches and NX-OS Versions Supporting Guest Shell
Platforms |
Minimum Version |
Nexus 3000 series |
7.0(3)I2(1) |
Nexus 9000 series |
7.0(3)I2(1) |
Platform Resource Requirements
The Guest Shell reserves a specific amount of memory in Bootflash. Upon activation, it reserves dynamic RAM and CPU resources, as shown in Table 7-2.
Table 7-2 Nexus Resource Requirement for Guest Shell
Platforms |
DRAM Reservation |
Bootflash Reservation |
CPU reservation |
Nexus 3000 series |
256 MB |
200 MB |
1% |
Nexus 9000 series |
256 MB |
200 MB |
1% |
By default, Nexus switches with 4 GB of RAM will not enable Guest Shell. Use the guestshell enable command to install and enable Guest Shell.
Bash
In addition to Guest Shell, Cisco Nexus9000 Series devices support access to the Bourne-Again Shell (Bash). Bash interprets commands that you enter or commands that are read from a shell script. The following sections discuss how Bash enables access to the underlying Linux system on the device and how it manages the system. Bash shell is supported on both Cisco Nexus 3000 series as well as 9000-series platforms, as shown in Table 7-3.
Table 7-3 Nexus Switches and NX-OS Versions Supporting Bash
Platforms |
Minimum Version |
Nexus 3000 series |
6.1(2)I2(2) |
Nexus 9000 series |
6.1(2)I2(2) |
The coming sections discuss how Bash enables direct and root access to the underlying kernel and how it instantiates the Docker service and containers.
LXC-based Open Agent Container (OAC)
OAC is a 32-bit, CentOS 6.7-based container that is built specifically to support open agents like Puppet and Chef to manage Nexus switching platforms.
With the current architecture, Open Agents cannot be directly installed and run on Nexus platforms. To overcome this challenge, a special environment is built, which is a decoupled execution space within an LXC called as the Open Agent Container (OAC). Having an execution space that is decoupled from the native host system enables customization of the environment to meet the applications’ requirements without affecting the host systems’ applications or any other containers.
Platforms Supported
Open Agent Container is one of the earliest container environments supported in Nexus platforms, and it is supported only in Nexus 5600, Nexus 6000, and Nexus 7000/7700 series platforms. Table 7-4 shows the minimum NX-OS release required for each platform supporting OAC.
Table 7-4 Nexus Switches and NX-OS Versions Supporting OAC
Platforms |
Minimum Version |
Nexus 5600 series |
7.3(0)N1(1) |
Nexus 6000 series |
7.3(0)N1(1) |
Nexus 7000/7700 |
7.3(0)D1(1) |
Platform Resource Requirements
As the file required to instantiate and for associated data storage, OAC occupies up to a specific memory size in bootflash. Upon activation, it requires dynamic RAM and CPU resources, as shown in Table 7-5.
Table 7-5 Nexus Resource Requirement for OAC
Platforms |
DRAM Reservation |
Bootflash Reservation |
CPU Reservation |
Nexus 5600 series |
256 MB |
400 MB |
1% |
Nexus 6000 series |
256 MB |
400 MB |
1% |
Nexus 7000/7700 |
256 MB |
400 MB |
1% |
Container Infrastructure Configuration and Instantiation
This section explains and provides procedures to instantiate different types of containers and to access, configure, manage, and orchestrate them. It also provides detailed steps to deploy and manage applications in the containers.
Guest Shell
Just as with OAC, Cisco Nexus 3000/9000 Series devices support access to an isolated execution environment, called the Guest Shell, which is running within a secure Linux Container (sLXC), as illustrated in Figure 7-3. Under the hood, the Guest Shell is just a libvirt-managed LXC container. This Guest Shell is based on CentOS 7 and can be managed using traditional Linux commands.
)
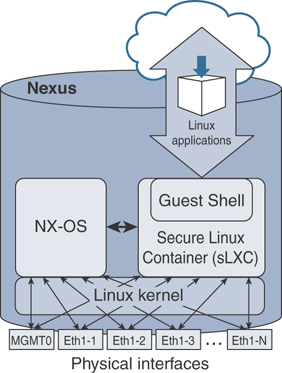
Figure 7-3 Guest Shell in NX-OS
The Guest Shell has various functions and offers key benefits that aid developers in building and hosting applications in Nexus platforms, such as providing access to the network, NX-OS CLI, bootflash filesystem, and above all, the ability to install Python scripts and Linux applications.
Guest Shell OVA File
In Nexus 3000 and 9000 switches, the .ova file for the default version of Guest Shell is integrated with the NX-OS image, and as previously discussed, you do not have to download and install an .ova to enable it.
Deployment Model and Workflow
It is simple to activate Guest Shell in supported platforms, and it can be done with one command, as shown in Example 7-1. The Guest Shell needs to be explicitly activated only in the first generation of the Nexus 3000 platform that came with 4 GB RAM. In later generations of Nexus 3000 and Nexus 9000 platforms, Guest Shell is enabled by default.
This guestshell enable command does the following:
Creates a virtual service instance
Extracts the .ova file built into NX-OS
Validates the contents in the file
Creates a virtual environment in the device
Instantiates the Guest Shell container
Example 7-1 Enable Guest Shell in NX-OS
N3K-C3548P# guestshell enable
2019 Sep 12 02:04:00 N3K-C3548P %$ VDC-1 %$ %VMAN-2-INSTALL_STATE: Installing
  virtual service 'guestshell+'
N3K-C3548P#
N3K-C3548P# show virtual-service list
Virtual Service List:
Name                    Status             Package Name
-----------------------------------------------------------------------
guestshell+             Activating         guestshell.ova
N3K-C3548P#
2019 Sep 12 02:04:55 N3K-C3548P %$ VDC-1 %$ %VMAN-2-ACTIVATION_STATE: Successfully
  activated virtual service 'guestshell+'
N3K-C3548P# show virtual-service list
Virtual Service List:
Name                    Status             Package Name
-----------------------------------------------------------------------
guestshell+             Activated          guestshell.ova
N3K-C3548P#
To know the resources allocated to the shell, use the show guestshell command. As you can see in Example 7-2, it reports the operational state of the shell, disk, memory, and CPU resource reservation, and it reports the filesystems/devices mounted in the shell. The utilization command shown next shows usage of memory, CPU, and storage resources in real time.
Example 7-2 Guest Shell Status and Resource Allocation
N3K-C3548P#
N3K-C3548P# show guestshell
Virtual service guestshell+ detail
  State                 : Activated
  Package information
    Name                : guestshell.ova
    Path                : /isanboot/bin/guestshell.ova
    Application
      Name              : GuestShell
      Installed version : 2.4(0.0)
      Description       : Cisco Systems Guest Shell
    Signing
      Key type          : Cisco release key
      Method            : SHA-1
    Licensing
      Name              : None
      Version           : None
  Resource reservation
    Disk                : 250 MB
    Memory              : 256 MB
    CPU                 : 1% system CPU

  Attached devices
    Type              Name        Alias
    ---------------------------------------------
    Disk              _rootfs
    Disk              /cisco/core
    Serial/shell
    Serial/aux
    Serial/Syslog                 serial2
    Serial/Trace                  serial3
N3K-C3548P#
N3K-C3548P# show virtual-service utilization name guestshell+
Virtual-Service Utilization:

CPU Utilization:
  Requested Application Utilization:  1 %
  Actual Application Utilization:  0 % (30 second average)
  CPU State: R : Running

Memory Utilization:
  Memory Allocation: 262144 KB
  Memory Used:       13444 KB

Storage Utilization:
  Name: _rootfs, Alias:
    Capacity(1K blocks):  243823      Used(1K blocks): 156896
    Available(1K blocks): 82331       Usage: 66 %

  Name: /cisco/core, Alias:
    Capacity(1K blocks):  2097152     Used(1K blocks): 0
    Available(1K blocks): 2097152     Usage: 0  %
N3K-C3548P#
By default, the resources allocated to the Guest Shell are small compared to the total resources available in a switch. An administrator can change the size of the CPU, memory, and root filesystem (rootfs) resources allocated to the Guest Shell by using guestshell resize commands in the configuration mode. Note that after changing resource allocations, a Guest Shell reboot is required. This can be achieved by using the guestshell reboot command, which basically deactivates and reactivates the Guest Shell.
Accessing Guest Shell
By default, the Guest Shell starts with an open-ssh service as soon as it is enabled. The server listens to TCP port 17700 on the local host loopback IP interface 127.0.0.1. This provides password-less access to the Guest Shell from the NX-OS, as shown in Example 7-3.
Example 7-3 Access Guest Shell
N3K-C3548P#
N3K-C3548P# guestshell
[admin@guestshell ~]$
[admin@guestshell ~]$ whoami
admin
[admin@guestshell ~]$ hostnamectl
   Static hostname: guestshell
         Icon name: computer-container
           Chassis: container
        Machine ID: 2a79cdc74cdc45659ad7788742da0599
           Boot ID: 295a7ceda3684f3caa2d5597de8ae1e0
    Virtualization: lxc-libvirt
  Operating System: CentOS Linux 7 (Core)
       CPE OS Name: cpe:/o:centos:centos:7
            Kernel: Linux 4.1.21-WR8.0.0.25-standard
      Architecture: x86-64
[admin@guestshell ~]$
[admin@guestshell ~]$
[admin@guestshell ~]$ ps -ef | grep 17700

UID        PID  PPID  C STIME TTY      TIME     CMD
root        91     1  0 Aug30 ?        00:00:00 /usr/sbin/sshd -D -f /etc/ssh/
  sshd_config-cisco -p 17700 -o ListenAddress=localhost
admin     1515  1495  0 18:40 pts/4    00:00:00 grep --color=auto 17700
[admin@guestshell ~]$
Notice that the file used to spawn the default SSH process is /etc/ssh/sshd_config-cisco. If this file is altered, the guestshell command might not function properly. If that occurs, it is recommended that you destroy and re-enable the Guest Shell.
Accessing Guest Shell via SSH
To access the Guest Shell, you need to be in the switch first and then access the shell using the guestshell command mentioned earlier in this chapter in “Accessing Guest Shell.” This access can be slow, and it is highly preferable to have a direct SSH access.
As you see in Example 7-4, after logging into the Guest Shell, check the SSH configuration—the TCP port it is listening to and the IPv4/v6 addresses associated to the SSH service. Because NX-OS has allocated TCP port number 22 to the SSH process running in the switch, configure an unused and different TCP port number for the Guest Shell’s SSH daemon. As you see in Example 7-4, /etc/ssh/sshd_config has Port 2222 assigned to the service, and it is listening for connections at 10.102.242.131, which is the IP address assigned to the Ethernet1/1 interface of the switch. Make sure to configure the DNS server for name resolution and domain information for the Guest Shell and the applications installed in it to resolve domain names.
Example 7-4 Guest Shell Networking
[admin@guestshell ~]$ more /etc/ssh/sshd_config
<snip>
Port 2222
#AddressFamily any
ListenAddress 10.102.242.131
#ListenAddress ::
<snip>
[admin@guestshell ~]$
[admin@guestshell ~]$ cat /etc/resolv.conf
nameserver 8.8.8.8
search example.com
[admin@guestshell ~]$
In any CentOS-based Linux platform, Guest Shell uses systemd as its service manager. Therefore, systemctl commands can be used to start, stop, restart, reload, or check the status of the SSH service, as shown in Example 7-5. Check the status of the SSH service before starting it.
Example 7-5 Activate SSH Service
[admin@guestshell etc]$ systemctl start sshd
[admin@guestshell ~]$
[admin@guestshell ~]$ systemctl status sshd.service
sshd.service - OpenSSH server daemon
Loaded: loaded (/usr/lib/systemd/system/sshd.service; disabled; vendor preset:
  enabled)
Active: inactive (dead)
<snip>
[admin@guestshell ~]$
[admin@guestshell ~]$ systemctl start sshd.service -l
[admin@guestshell ~]$
[admin@guestshell ~]$ systemctl status sshd.service -l
sshd.service - OpenSSH server daemon
Loaded: loaded (/usr/lib/systemd/system/sshd.service; disabled; vendor preset:
  enabled)
Active: active (running) since Sat 2019-08-31 15:33:52 UTC; 4s ago
Main PID: 886 (sshd)
 CGroup: /system.slice/sshd.service
         └─886 /usr/sbin/sshd -D
Aug 31 15:33:52 guestshell sshd[886]: Executing: /usr/sbin/sshd -D
Aug 31 15:33:52 guestshell sshd[886]: Server listening on 10.102.242.131 port 2222.
[admin@guestshell ~]$
As shown in Example 7-6, make sure the TCP socket assigned to Guest Shell’s SSH service is open and in the listening state. Because Guest Shell uses kstack networking implementation, a Kernel Socket is allocated for TCP port 2222, as shown in Example 7-6.
Example 7-6 Open Kernel Sockets in Nexus Switch
N3K-C3548P#
N3K-C3548P# show sockets connection
Total number of netstack tcp sockets: 3
Active connections (including servers)
        Protocol State/       Recv-Q/   Local Address(port)/
                 Context      Send-Q    Remote Address(port)
[host]: tcp(4/6) LISTEN       0         *(22)
                 Wildcard     0         *(*)

[host]: tcp      LISTEN       0         *(161)
                 Wildcard     0         *(*)

[host]: tcp(4/6) LISTEN       0         *(161)
                 Wildcard     0         *(*)

<snip>
Kernel Socket Connection:
Netid    State     Recv-Q  Send-Q    Local Address:Port    Peer Address:Port
tcp      LISTEN    0       128       10.102.242.131:2222   *:*
<snip>
Once the SSH service is up and running and all the configured sockets are in the listening state, users can access Guest Shell via SSH from an external device, as shown in Example 7-7.
Example 7-7 SSH Access to Guest Shell
root@Ubuntu-Server1$ ssh -p 2222 admin@10.102.242.131
admin@10.102.242.131's password:
Last login: Sat Aug 31 11:42:26 2019
[admin@guestshell ~]$
It is possible to run multiple instances of SSH Server daemons and associate them to any VRF active in the switch. In other words, the Guest Shell can be accessed via SSH through two sockets associated to different namespaces or VRFs, hence from different networks. Example 7-8 shows that the switch has two sockets open: one for management VRF and the other one for default VRF. The socket allocated for the SSH service in the default VRF is (172.16.1.1:5123) and is (10.102.242.131:2222) for the management VRF.
Example 7-8 SSH Service per Namespace
[admin@guestshell ~]$ chvrf default
[admin@guestshell ~]$
[admin@guestshell ~]$ /usr/sbin/sshd -p 5123 -o ListenAddress=172.16.1.1
[admin@guestshell ~]$
[admin@guestshell ~]$ exit
N3K-C3548P#
N3K-C3548P# show sockets connection | include Netid|2222|5123
Netid  State      Recv-Q Send-Q Local Address:Port       Peer Address:Port
tcp    LISTEN     0      128    172.16.1.1:5123          *:*
tcp    LISTEN     0      128    10.102.242.131:2222      *:*
N3K-C3548P#
Guest Shell Networking Setup and Verification
Guest Shell is a powerful container and application hosting environment because it provides access to every front-panel port, VLAN SVIs, and port-channels in the device. Using the Cisco kstack implementation, all these interfaces are represented and available as network devices in the Linux kernel.
With the command shown in Example 7-9, check the VRFs that are visible to the Guest Shell container, where each VRF is a Kernel Network Namespace, as represented in the Linux kernel.
Example 7-9 Guest Shell Namespaces
[admin@guestshell ~]$ ip netns list
management
default
[admin@guestshell ~]$
Figure 7-4 illustrates that namespaces created for each of the VRFs and shows the interfaces associated to each of these VRFs.
)
Figure 7-4 Guest Shell Namespaces
Because the physical and logical interfaces are accessible through network namespaces, the container can access network elements directly. As shown in Example 7-10, the chvrf command switches the context to a specific VRF, and ifconfig -a is used to list the interfaces associated to the current context.
The chvrf command is a helper utility that uses the ip netns exec command under the hood to switch the VRF context. Apart from the ifconfig command provided in this example, you can also use the ip link show command to obtain a list of interfaces associated to the specific context.
Example 7-10 Guest Shell Namespaces and Network Devices
[admin@guestshell ~]$ chvrf default
[admin@guestshell ~]$
[admin@guestshell ~]$ ifconfig -a
Eth1-1: flags=4163<UP,BROADCAST,RUNNING,MULTICAST>  mtu 1500
        inet 10.102.242.131 netmask 255.255.255.240 broadcast 10.102.242.143
        ether 00:3a:9c:5a:00:67  txqueuelen 100  (Ethernet)
        RX packets 2045299  bytes 469647600 (447.8 MiB)
        RX errors 0  dropped 1615524  overruns 0  frame 0

        TX packets 556549  bytes 95536394 (91.1 MiB)
        TX errors 0  dropped 892 overruns 0  carrier 0  collisions 0

Eth1-2: flags=4099<UP,BROADCAST,MULTICAST>  mtu 1500
        ether 00:3a:9c:5a:00:67  txqueuelen 100  (Ethernet)
        RX packets 0  bytes 0 (0.0 B)
        RX errors 0  dropped 0  overruns 0  frame 0
        TX packets 0  bytes 0 (0.0 B)
        TX errors 0  dropped 0 overruns 0  carrier 0  collisions 0

Eth1-3: flags=4099<UP,BROADCAST,MULTICAST>  mtu 1500
        ether 00:3a:9c:5a:00:67  txqueuelen 100  (Ethernet)
        RX packets 0  bytes 0 (0.0 B)
<snip>
Eth1-48: flags=4099<UP,BROADCAST,MULTICAST>  mtu 1500
        ether 00:3a:9c:5a:00:67  txqueuelen 100  (Ethernet)
        RX packets 0  bytes 0 (0.0 B)
        RX errors 0  dropped 0  overruns 0  frame 0
        TX packets 0  bytes 0 (0.0 B)
        TX errors 0  dropped 0 overruns 0  carrier 0  collisions 0

Lo100: flags=65<UP,RUNNING>  mtu 1500
        inet 10.1.1.1  netmask 255.255.255.0
        ether 00:3a:9c:5a:00:60  txqueuelen 100  (Ethernet)
        RX packets 0  bytes 0 (0.0 B)
        RX errors 0  dropped 0  overruns 0  frame 0
        TX packets 0  bytes 0 (0.0 B)
        TX errors 0  dropped 0 overruns 0  carrier 0  collisions 0
<snip>
veobc: flags=67<UP,BROADCAST,RUNNING>  mtu 1494
        inet 127.1.2.1  netmask 255.255.255.0  broadcast 127.1.2.255
        ether 00:00:00:00:01:01  txqueuelen 0  (Ethernet)
        RX packets 0  bytes 0 (0.0 B)
        RX errors 0  dropped 0  overruns 0  frame 0
        TX packets 134  bytes 57112 (55.7 KiB)
        TX errors 0  dropped 0 overruns 0  carrier 0  collisions 0
<snip>
[admin@guestshell ~]$
All the software data structures, including ARP tables, routing tables, and prefixes, are synchronized between NX-OS and the Linux kernel by the NetBroker process, as illustrated in Figure 7-5. Because the Guest Shell uses the Linux kstack, the data structures synchronization is automatic.
)
Figure 7-5 NetBroker—Synchronize NX-OS and the Linux Kernel
The commands provided in Example 7-11 show the routing table, interface configuration, and statistics as well as the ARP cache in a specific context.
Example 7-11 Guest Shell Routing and ARP Tables—Default Namespace
[admin@guestshell ~]$
[admin@guestshell ~]$ chvrf default route -vn
Kernel IP routing table

Destination     Gateway         Genmask         Flags Metric Ref  Use Iface
0.0.0.0         10.102.242.129  0.0.0.0         UG    51     0      0 Eth1-1
10.1.1.0        0.0.0.0         255.255.255.0   U     0      0      0 Lo100
10.102.242.128  0.0.0.0         255.255.255.240 U     0      0      0 Eth1-1
10.102.242.129  0.0.0.0         255.255.255.255 UH    51     0      0 Eth1-1
127.1.0.0       0.0.0.0         255.255.0.0     U     0      0      0 veobc
127.1.2.0       0.0.0.0         255.255.255.0   U     0      0      0 veobc
[admin@guestshell ~]$
[admin@guestshell ~]$ ifconfig -a Eth1-1
Eth1-1: flags=4163<UP,BROADCAST,RUNNING,MULTICAST>  mtu 1500
        inet 10.102.242.131 netmask 255.255.255.240 broadcast 10.102.242.143
        ether 00:3a:9c:5a:00:67  txqueuelen 100  (Ethernet)
        RX packets 2044610  bytes 469523762 (447.7 MiB)
        RX errors 0  dropped 1614879  overruns 0  frame 0
        TX packets 556415  bytes 95505736 (91.0 MiB)
        TX errors 0  dropped 892 overruns 0  carrier 0  collisions 0
[admin@guestshell ~]$
[admin@guestshell ~]$ arp 10.102.242.129
Address         HWtype  HWaddress           Flags Mask            Iface
10.102.242.129  ether   00:1e:f7:be:70:c2   CM                    Eth1-1
[admin@guestshell ~]$
Make sure the new route added in the default VRF context is synchronized to the global routing table. As shown in Example 7-12, a /16 route is added in the NX-OS, which has synchronized to the Guest Shell.
Example 7-12 NX-OS and Guest Shell Synchronization
N3K-C3548P#(config)# config t
Enter configuration commands, one per line. End with CNTL/Z.
N3K-C3548P(config)# ip route 192.168.0.0/16 10.102.242.129
N3K-C3548P(config)# end
N3K-C3548P# guestshell
[admin@guestshell ~]$
[admin@guestshell ~]$ chvrf default route -nv
Kernel IP routing table
Destination     Gateway         Genmask         Flags Metric Ref  Use Iface
0.0.0.0         10.102.242.129  0.0.0.0         UG    51     0      0 Eth1-1
10.1.1.0        0.0.0.0         255.255.255.0   U     0      0      0 Lo100
10.102.242.128  0.0.0.0         255.255.255.240 U     0      0      0 Eth1-1
10.102.242.129  0.0.0.0         255.255.255.255 UH    51     0      0 Eth1-1
127.1.0.0       0.0.0.0         255.255.0.0     U     0      0      0 veobc
127.1.2.0       0.0.0.0         255.255.255.0   U     0      0      0 veobc
192.168.0.0     10.102.242.129  255.255.0.0     UG    51     0      0 Eth1-1
[admin@guestshell ~]$
The NetBroker module synchronizes the ARP, routes, and other Layer 3 configuration to every kernel namespace available. Now you will switch to the Management namespace and verify the routes and ARP cache there (see Example 7-13).
Example 7-13 Guest Shell Routing and ARP Tables—Management Namespace
[admin@guestshell ~]$
[admin@guestshell ~]$ chvrf management
[admin@guestshell ~]$
[admin@guestshell ~]$ ifconfig -a
eth1: flags=4099<UP,BROADCAST,RUNNING,MULTICAST>  mtu 1500
        inet 172.16.31.5  netmask 255.255.255.0  broadcast 172.16.31.255
        ether 00:3a:9c:5a:00:60  txqueuelen 1000  (Ethernet)
        RX packets 656019  bytes 48111417 (45.8 MiB)
        RX errors 0  dropped 0  overruns 0  frame 0
        TX packets 118874  bytes 31380645 (29.9 MiB)
        TX errors 0  dropped 0 overruns 0  carrier 0  collisions 0
<snip>
[admin@guestshell ~]$ chvrf management route -vn
Kernel IP routing table

Destination     Gateway         Genmask         Flags Metric Ref  Use Iface
0.0.0.0         172.16.31.1     0.0.0.0         UG    51     0      0 eth1
<snip>
[admin@guestshell ~]$
[admin@guestshell ~]$ arp 172.16.31.1
Address         HWtype  HWaddress           Flags Mask            Iface
172.16.31.1     ether   00:1e:f7:a3:81:c6   CM                    eth1
[admin@guestshell ~]$
Installation and Verification of Applications
As you see in Example 7-14, the Guest Shell in Cisco Nexus 9000 Series devices supports Python version 2.7.5 in both interactive and noninteractive (script) modes.
The Python scripting capability in Nexus 9000 gives programmatic access to the device’s command-line interface (CLI) to perform various tasks like Power On Auto Provisioning (POAP) and Embedded Event Manager (EEM).
Example 7-14 Python in Guest Shell
[admin@guestshell ~]$
[admin@guestshell ~]$ python
Python 2.7.5 (default, Jun 17 2014, 18:11:42)
[GCC 4.8.2 20140120 (Red Hat 4.8.2-16)] on linux2
Type "help", "copyright", "credits" or "license" for more information.
>>> print "Hello"
Hello
>>> quit()
[admin@guestshell ~]$
You will start with developing and running a Python application in the Guest Shell.
Custom Python Application
Python applications can be run from NX-OS using the run guestshell python command, or they can be natively run in the shell itself. As you see in Example 7-15, the Python application hello.py runs natively from NX-OS using the run guestshell python command and from the Guest Shell using the python command.
Example 7-15 Run Python Application in Guest Shell
N3K-C3548P#
N3K-C3548P# show file bootflash:hello.py
#!/usr/bin/env python

import sys

print "Hello, World!"
list = ['one', 'two', 'three']
for item in list:
      print item
N3K-C3548P#
N3K-C3548P# run guestshell python /bootflash/hello.py
Hello, World!
one
two
three
N3K-C3548P#
N3K-C3548P# guestshell
[admin@guestshell ~]$
[admin@guestshell ~]$ python /bootflash/hello.py
Hello, World!
one
two
three
[admin@guestshell ~]$ exit
N3K-C3548P#
Python API–Based Application
Cisco NX-OS has a built-in package providing API access to CLIs at the exec level as well as configuration commands, referred to as Python APIs. As you learned previously, Guest Shell also has access to Python APIs. As you see in Example 7-16, an NX-OS CLI show clock is accessed using the Python API available in the Guest Shell.
Example 7-16 Python API–Based Application
N3K-C3548P#
N3K-C3548P# guestshell
[admin@guestshell ~]$
[admin@guestshell ~]$ python
Python 2.7.5 (default, Jun 17 2014, 18:11:42)
[GCC 4.8.2 20140120 (Red Hat 4.8.2-16)] on linux2
Type "help", "copyright", "credits" or "license" for more information.
>>>
>>> from cli import *
>>> cli('show clock')
'02:24:50.130 UTC Sun Sep 01 2019\nTime source is NTP\n'
>>> exit()
[admin@guestshell ~]$
Example 7-17 shows a sample custom Python application that leverages Python APIs. In this example, cli returns the raw format of the CLI output, including control and special characters. clid returns a dictionary of attribute names and values for the given CLI commands, which makes it easier to process the data programmatically and automate.
Example 7-17 Python API–Based Application: JSON
[admin@guestshell ~]$ more PY-API2.py

#!/usr/bin/python
from cli import *
import json

print("STANDARD CLI OUTPUT ...")
print (cli('show interface eth1/1 brief'))

print("JSON FORMAT CLI OUTPUT ...")
print (clid('show interface eth1/1 brief'))

[admin@guestshell ~]$
[admin@guestshell ~]$
[admin@guestshell ~]$ python PY-API2.py
STANDARD CLI OUTPUT ...
-----------------------------------------------------------------------------
Ethernet   VLAN    Type Mode   Status  Reason     Speed     Port
Interface                                                   Ch #
-----------------------------------------------------------------------------
Eth1/1     --      eth  routed up      none       1000(D)   --

JSON FORMAT CLI OUTPUT ...
{"TABLE_interface": {"ROW_interface": {"interface": "Ethernet1/1", "vlan": "--",
  "type": "eth", "portmode": "routed", "state": "up", "state_rsn_desc": "none",
  "speed": "1000", "ratemode": "D"}}}
[admin@guestshell ~]$
To learn more about Python APIs and the Software Development Kit (SDK) supported in Nexus 9000 platforms, refer to the Cisco Nexus 9000 Series SDK User Guide provided in the “References” section.
The dohost command shown in Example 7-18 is a Python wrapper script using NX-API functions. Make sure to have the NX-API feature enabled to leverage this capability. Using dohost capability, application developers can perform show commands as well as configuration commands.
Example 7-18 Run NX-OS CLIs in Guest Shell with dohost
[admin@guestshell ~]$
[admin@guestshell ~]$ dohost "show clock"
02:23:41.492 UTC Sun Sep 01 2019
Time source is NTP
As you learned in the previous section, the Guest Shell with CentOS 7 also can install software packages using Yum utility. The Guest Shell is prepopulated with many of the common tools that would naturally be expected on a networking device, including net-tools, iproute, tcpdump, OpenSSH, and the PIP for installing additional Python packages. As you have just learned, Python 2.7.5 is included by default.
Leveraging high-end capabilities and features in Guest Shell, it is easy to integrate it into your day-to-day automation workflow. With the support of device-level API integration and support for scripting with languages like Python, Ruby, and so on, it is easier now to do on-box prototyping of applications or scripts. Guest Shell has its user space and resources isolated from the host and other containers and any faults/failures seen in those container spaces. All the capabilities make Guest Shell a powerful environment to develop and host applications.
Bash
In addition to the NX-OS CLI, Cisco Nexus 9000 Series devices support access to Bash. Bash interprets commands that you enter or commands that are read from a shell script. It enables access to the underlying Linux kernel on the device and to manage the system.
As you learned in the previous sections, Bash is supported in Nexus 3000 and 9000 switching platforms, but it is disabled by default.
Enabling Bash
In the supported platforms, under configuration mode, the feature bash-shell command enables this feature with no special license required. Use the show bash-shell command to learn the current state of the feature, as shown in Example 7-19.
Example 7-19 Check Status and Enable Bash
N9K-C93180YC# show bash-shell
Bash shell is disabled
N9K-C93180YC#
N9K-C93180YC# conf t
Enter configuration commands, one per line. End with CNTL/Z.
N9K-C93180YC(config)# feature bash-shell
N9K-C93180YC(config)# end
N9K-C93180YC#
N9K-C93180YC# show bash-shell
Bash shell is enabled
N9K-C93180YC#
Accessing Bash from NX-OS
In Cisco NX-OS, Bash is accessible for users whose role is set to network-admin or dev-ops; through Bash, a user can change system settings or parameters that could impact devices’ operation and stability.
You can execute Bash commands with the run bash command, as shown in Example 7-20.
Example 7-20 Run Bash Commands from NX-OS
N9K-C93180YC#
N9K-C93180YC# run bash pwd
/bootflash/home/admin
N9K-C93180YC#
N9K-C93180YC# run bash ls
N9K-C93180YC# run bash uname -r
4.1.21-WR8.0.0.25-standard
N9K-C93180YC#
N9K-C93180YC# run bash more /proc/version
Linux version 4.1.21-WR8.0.0.25-standard (divvenka@ins-ucs-bld8) (gcc version 4.6.3
  (Wind River Linux Sourcery CodeBench 4.6-60) ) #1 SMP Sun Nov 4 19:44:18 PST 2018
N9K-C93180YC#
N9K-C93180YC#
The run bash command loads Bash and begins at the home directory for the user. Example 7-21 shows how to load and run Bash as an admin user.
Example 7-21 Access Bash Through Console
N9K-C93180YC#
N9K-C93180YC# run bash
bash-4.3$
bash-4.3$ pwd
/bootflash/home/admin
bash-4.3$
bash-4.3$ whoami
admin
bash-4.3$
bash-4.3$ id
uid=2002(admin) gid=503(network-admin) groups=503(network-admin),504(network-
  operator)
bash-4.3$
bash-4.3$ more /proc/version
Linux version 4.1.21-WR8.0.0.25-standard (divvenka@ins-ucs-bld8) (gcc version 4.
6.3 (Wind River Linux Sourcery CodeBench 4.6-60) ) #1 SMP Sun Nov 4 19:44:18 PST
 2018
bash-4.3$
For users without network-admin or dev-ops level privileges, the run bash command will not be parsed, and when executed, the system will report that permission has been denied. As you see in Example 7-22, the testuser with the privilege level not set to network-admin or dev-ops has its permission to execute the run bash command denied.
Example 7-22 Access Bash Privileges
User Access Verification
N9K-C93180YC login: testuser
Password:
Cisco Nexus Operating System (NX-OS) Software
TAC support: http://www.cisco.com/tac
Copyright (C) 2002-2018, Cisco and/or its affiliates.
All rights reserved.
<snip>
N9K-C93180YC# run bash
% Permission denied for the role
N9K-C93180YC#
Accessing Bash via SSH
Before accessing Bash via SSH, make sure the SSH service is enabled (see Example 7-23).
Example 7-23 Access Bash Privileges
bash-4.3$ service /etc/init.d/sshd status
openssh-daemon (pid 14190) is running…
bash-4.3$
bash-4.3$ ps -ef | grep sshd
UID        PID  PPID  C STIME TTY          TIME CMD
admin     5619  5584  0 01:26 ttyS0    00:00:00 grep sshd
root     14190     1  0 Sep12 ?        00:00:00 /usr/sbin/sshd
bash-4.3$
bash-4.3$ ps --pid 1
  PID TTY          TIME CMD
    1 ?        00:00:28 init
bash-4.3$
An NX-OS admin user can configure a user with privileges to directly log in to the Bash. Example 7-24 demonstrates user bashuser with a default shelltype access.
Example 7-24 Access Bash Privileges: shelltype
N9K-C93180YC#
N9K-C93180YC# conf t
Enter configuration commands, one per line. End with CNTL/Z.
N9K-C93180YC(config)#
N9K-C93180YC(config)# username bashuser password 0 Cisco!123
N9K-C93180YC(config)# username bashuser shelltype bash
N9K-C93180YC(config)# end
N9K-C93180YC#
Log in to Bash directly from an external device with username bashuser, as shown in Example 7-25.
Example 7-25 Access Bash—Shelltype User
Ubuntu-Server$ ssh -l bashuser 172.16.28.5
User Access Verification
Password:
-bash-4.3$
-bash-4.3$ pwd
/var/home/bashuser
-bash-4.3$
-bash-4.3$ id
uid=2003(bashuser) gid=504(network-operator) groups=504(network-operator)
-bash-4.3$
-bash-4.3$ whoami
bashuser
-bash-4.3$
-bash-4.3$ exit
logout
Connection to 10.102.242.131 closed.
Ubuntu-Server$
Following are the guidelines for elevating the privileges of an existing user.
Bash must be enabled before elevating user privileges.
Only an admin user can escalate privileges of a user to root.
Escalation to root is password protected.
If you SSH to the switch using the root username through a nonmanagement interface, it will default to Linux Bash shell-type access for the root user. If a user has established an SSH connection directly to Bash and needs to access NX-OS, use vsh commands, as shown in Example 7-26.
Example 7-26 Access NX-OS from Bash
bash-4.3$
bash-4.3$ vsh -c "show clock"
21:17:24:136 UTC Fri Sep 13 2019
Time source is NTP
bash-4.3$
bash-4.3$ su - root
Password:
root@N9K-C93180YC#
root@N9K-C93180YC# id
uid=0(root) gid=0(root) groups=0(root)
root@N9K-C93180YC# whoami
root
root@N9K-C93180YC#
root@N9K-C93180YC# vsh
Cisco Nexus Operating System (NX-OS) Software
TAC support: http://www.cisco.com/tac
Copyright (C) 2002-2018, Cisco and/or its affiliates.
All rights reserved.
<snip>
root@N9K-C93180YC#
root@N9K-C93180YC# show clock
21:18:53.903 UTC Fri Sep 13 2019
Time source is NTP
root@N9K-C93180YC#
Based on what you have learned this section, Bash interprets the instructions and commands that a user or application provides and executes. With direct access to the underlying infrastructure, file systems, and network interfaces, it enables developers to build and host applications to monitor and manage the devices. However, users should exercise extreme caution when accessing, configuring, or making changes to the underlying infrastructure because doing so could affect the host system’s operation and performance. Remember that Bash directly accesses the Wind River Linux (WRL) on which NX-OS is running in a user space, and unlike Guest Shell or OAC, it is not isolated from the host system.
Docker Containers
Docker provides a way to securely run applications in an isolated environment, with all dependencies and libraries packaged. If you want to know more about Docker, its usage, and functionalities, refer to the Docker Documentation page provided in the “References” section.
Beginning with Release 9.2(1), support has been included for using Docker within the Cisco NX-OS switch. The version of Docker that is included on the switch is 1.13.1. By default, the Docker service or daemon is not enabled. You must start it manually or set it up to automatically restart when the switch boots up.
Even though the scope of this book does not intend to cover Docker in detail, it is good to take a quick look at the key components in the Docker architecture and their functions, as illustrated in Figure 7-6.
)
Figure 7-6 Docker Architecture
Docker Client
The Docker client enables end users to interact with the Docker host and the daemons running on it. The Docker client can be on a dedicated device or can reside on the same device as a host. A Docker client can communicate with multiple daemons running on multiple host devices. The Docker client provides a CLI and REST APIs that allow users to issue build, run, and stop application commands to a Docker daemon. The main purpose of the Docker client is to provide a means to direct pulling images from a registry and having them run on a Docker host.
Docker Host
The Docker host provides an environment dedicated to executing and running applications. The key component is a Docker daemon that interacts with the client as well as the registry and with containers, images, the network, and storage. This daemon is responsible for all container-related activities and carrying out the tasks received via CLIs or APIs. The Docker daemon pulls the requested image and builds containers as requested by the client, following the instructions provided in a build file.
Images
Images are read-only templates providing instructions to create a Docker container. The images contain metadata that describe the container’s capabilities and needs. The necessary Docker images can be pulled from the Docker Hub or a local registry. Users can create their own and customized images by adding elements to extend the capabilities, using Dockerfile.
Containers
As has been discussed in previous chapters, containers are self-contained environments in which you run applications. The container is defined by the image and any additional configuration parameters provided during its instantiation. These configuration parameters are used to identify the file systems and partitions to mount, to set specific network mode, and so on.
Now you will learn how to enable and use Docker in the context of the Cisco Nexus switch environment.
Bash is a prerequisite to enable and activate Docker. Example 7-27 provides the detailed procedure to activate Docker. Before activating Docker, follow these steps.
Enable Bash.
Configure the domain name and name servers appropriately for the network.
If the switch is in a network that uses an HTTP proxy server, set up the http_proxy and https_proxy environment variables in the /etc/sysconfig/docker file.
Example 7-27 Enable Bash to Activate Docker Service
N9K-C93180YC# conf t
N9K-C93180YC(config)# feature bash-shell
N9K-C93180YC(config)# vrf context management
N9K-C93180YC(config-vrf)# ip domain-name cisco.com
N9K-C93180YC(config-vrf)# ip name-server 208.67.222.222
N9K-C93180YC(config-vrf)# ip name-server 208.67.220.220
N9K-C93180YC(config-vrf)# end
N9K-C93180YC# run bash
bash-4.3$
bash-4.3$ cat /etc/resolv.conf
domain cisco.com
nameserver 208.67.222.222
nameserver 208.67.220.220
bash-4.3$
bash-4.3$ cat /etc/sysconfig/docker | grep http
export http_proxy=http://192.168.21.150:8080
export https_proxy=http://192.168.21.150:8080
bash-4.3$
Starting Docker Daemon
Please be aware that when the Docker daemon is started for the first time, 2 GB of storage space is carved out for a file called dockerpart in the bootflash filesystem. This file will be mounted as /var/lib/docker. If needed, the default size of this space reservation can be changed by editing /etc/sysconfig/docker before you start the Docker daemon for the first time.
Start the Docker daemon by following Example 7-28.
Example 7-28 Enable Docker Service
bash-4.3$
bash-4.3$ service docker start
bash-4.3$
bash-4.3$ service docker status
dockerd (pid  5334) is running...
bash-4.3$
bash-4.3$ ps -ef | grep docker
UID   PID   PPID   C STIME TTY    TIME     CMD
root  16532     1  0 03:15 ttyS0  00:00:00 /usr/bin/dockerd --debug=true
root  16548 16532  0 03:15 ?      00:00:00 docker-containerd -l unix:///var
admin 16949 12789  0 03:18 ttyS0  00:00:00 grep docker
bash-4.3$
bash-4.3$
Instantiating a Docker Container with Alpine Image
As you can see in Example 7-29, the host device has various Docker images, including Alpine, Ubuntu, and nginx. Alpine Linux is a lightweight Linux distribution based on musl libc and Busybox, and it is security-oriented. Musl (read as, “muscle”) libc is a standard library of Linux-based devices focused on standards-conformance and safety. Busybox brings many UNIX/Linux utilities together into a single and small executable; because it is modular, it is easy to customize and integrate it into embedded systems. For more information, see the references provided for Alpine Linux, musl libc, and Busybox, in the “References” section at the end of this chapter.
Example 7-29 shows instantiating an Alpine Linux Docker container on the switch, which is, by default, launched in the host network mode. The Docker containers instantiated in the bridged networking mode have external network connectivity but do not necessarily care about the visibility into or access to ports in the host. Note that the containers operating in bridged networking mode are far more secure than the ones operating in host networking mode.
Example 7-29 Container with Alpine Image
bash-4.3$
bash-4.3$ docker images
REPOSITORY      TAG         IMAGE ID            CREATED             SIZE
docker          dind        12adad4e12e2        3 months ago        183 MB
ubuntu          latest      d131e0fa2585        4 months ago        102 MB
nginx           latest      27a188018e18        5 months ago        109 MB
alpine          latest      cdf98d1859c1        5 months ago        5.53 MB
centos          latest      9f38484d220f        6 months ago        202 MB
alpine          3.2         98f5f2d17bd1        7 months ago        5.27 MB
hello-world     latest      fce289e99eb9        8 months ago        1.84 kB
bash-4.3$
bash-4.3$
bash-4.3$ docker run --name=myalpine  -v /var/run/netns:/var/run/netns:ro,rslave
  --rm --network host --cap-add SYS_ADMIN -it alpine
/ #
/ # whoami
root
/ # id
uid=0(root) gid=0(root) groups=0(root),1(bin),2(daemon),3(sys), 4(adm),6(disk),10(wh
  eel),11(floppy),20(dialout),26(tape),27(video)
/ #
/ #  ip route
default via 10.102.242.129 dev Eth1-1  metric 51 onlink
10.1.1.0/24 dev Lo100 scope link
10.102.242.128/28 dev Eth1-1 scope link
10.102.242.129 dev Eth1-1 scope link  metric 51
127.1.0.0/16 dev veobc scope link  src 127.1.1.1
127.1.2.0/24 dev veobc scope link  src 127.1.2.1
172.17.0.0/16 dev docker0 scope link  src 172.17.0.1
172.18.0.0/16 dev br-b96ec30eb010 scope link  src 172.18.0.1
172.16.0.0/16 via 10.102.242.129 dev Eth1-1  metric 51 onlink
/ #
/ # ifconfig Eth1-1
Eth1-1    Link encap:Ethernet  Hwaddr 00:3A:9C:5A:00:67
          inet addr:10.102.242.131 Bcast:10.102.242.143 Mask:255.255.255.240
          UP BROADCAST RUNNING MULTICAST  MTU:1500  Metric:1
          RX packets:2873124 errors:0 dropped:2299051 overruns:0 frame:0
          TX packets:797153 errors:0 dropped:1230 overruns:0 carrier:0
          collisions:0 txqueuelen:100
          RX bytes:622065894 (593.2 MiB)  TX bytes:135952384 (129.6 MiB)
/#
Figure 7-7 illustrates a Docker container running an Alpine image that was instantiated from Bash by the commands provided in Example 7-29.
)
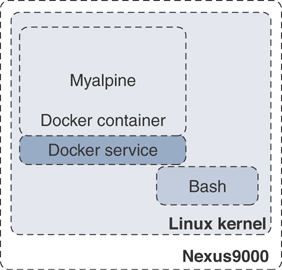
Figure 7-7 Alpine Docker Container
The –rm option used to launch the Docker container in Example 7-29 removes it automatically when the user exits the container with the exit command. Press Ctrl+Q to detach from the container without deinstantiating it and get back to Bash. Use the docker attach <container-id> command to reattach to the container that is still up and running, as shown in Example 7-30.
Example 7-30 Docker Processes—Attach to Container
bash-4.3$
bash-4.3$ docker ps
CONTAINER ID  IMAGE   COMMAND    CREATED        STATUS       PORTS   NAMES
6469af028115  alpine  "/bin/sh"  3 minutes ago  Up 3 minutes         myalpine
bash-4.3$
bash-4.3$ docker attach 6469af028115
/ #
/ #
If you want to mount a specific file system or partitions, use the -v option, as shown in Example 7-31, when you launch the container. The Bootflash file system will be mounted into and accessible only from the myalpine1 container; it will not be available from myalpine, which was instantiated without mounting the Bootflash file system.
Example 7-31 Docker Container—File System Mount
bash-4.3$
bash-4.3$ docker run --name=myalpine1  -v /var/run/netns:/var/run/netns:ro,rslave -v
  /bootflash:/bootflash --rm —-network host —-cap-add SYS_ADMIN -it alpine
/ #
/ # ls
bin        etc        media      proc       sbin       tmp
bootflash  home       mnt        root       srv        usr
dev        lib        opt        run        sys        var
/ # / # ifconfig
Eth1-1    Link encap:Ethernet  Hwaddr 00:3A:9C:5A:00:67
          inet addr:10.102.242.131 Bcast:10.102.242.143 Mask:255.255.255.240
          UP BROADCAST RUNNING MULTICAST  MTU:1500  Metric:1
          RX packets:2848104 errors:0 dropped:2282704 overruns:0 frame:0
          TX packets:786971 errors:0 dropped:1209 overruns:0 carrier:0
          collisions:0 txqueuelen:100
          RX bytes:618092996 (589.4 MiB)  TX bytes:134371507 (128.1 MiB)

Eth1-10   Link encap:Ethernet  Hwaddr 00:3A:9C:5A:00:67
          UP BROADCAST MULTICAST  MTU:1500  Metric:1
<snip>
The Alpine Docker containers instantiated in the past few examples were done in the default host namespace. To instantiate a Docker container in a specific network namespace, use the docker run command with the –network <namespace> option.
Managing Docker Container
Beyond instantiating and activating containers with applications installed, you need to know how to manage the containers. Container management becomes critical when containers are deployed at scale. This section discusses managing containers deployed in the Nexus switches, and associated techniques.
Container Persistence Through Switchover
To have Docker container persisting through the manual supervisor engine switchover, make sure to copy the dockerpart file from the active supervisor engine’s bootflash to the standby supervisor engine’s bootflash before the switchover of supervisor engines in applicable platforms like Nexus 9500. Be aware that the Docker containers will not be running continuously and will be disrupted during the switchover.
You will start an Alpine container and configure it to always restart unless it is explicitly stopped or the Docker service is restarted. Please note that this command uses the –restart option instead of the –rm option, which restarts the container right after the user exits. See Example 7-32.
Example 7-32 Docker Container—Persistent Restart
bash-4.3$
bash-4.3$ docker run -dit --name=myalpine2 --restart unless-stopped --network host
  --cap-add SYS_ADMIN -it alpine
da28182a03c4032f263789ec997eea314130a95e6e6e6a0574e49dfcba5f2776
bash-4.3$
bash-4.3$ docker ps
CONTAINER ID  IMAGE   COMMAND    CREATED        STATUS       PORTS  NAMES
0355f5ba1fd6  alpine  "/bin/sh"  18 minutes ago Up 5 minutes        myalpine2
bash-4.3$
bash-4.3$ docker attach 0355f5ba1fd6
/#
/# exit
bash-4.3$
bash-4.3$ docker ps
CONTAINER ID  IMAGE   COMMAND    CREATED        STATUS       PORTS  NAMES
0355f5ba1fd6  alpine  "/bin/sh"  19 minutes ago Up 2 seconds        myalpine2
bash-4.3$
With the previous commands, you have made the Alpine Linux container restart. As shown in Example 7-33, use the chkconfig utility to make the service persistent, before the supervisor engine switchover. Then copy the dockerpart file created in the active supervisor engine to standby.
Example 7-33 Docker Container—Restart on Supervisor Engine Failover
bash-4.3$
bash-4.3$ chkconfig | grep docker
bash-4.3$
bash-4.3$ chkconfig --add docker
bash-4.3$
bash-4.3$ chkconfig | grep docker
docker          0:off   1:off   2:on    3:on    4:on    5:on    6:off
bash-4.3$
bash-4.3$ service docker stop
Stopping dockerd: dockerd shutdown
bash-4.3$
bash-4.3$ cp /bootflash/dockerpart /bootflash_sup-remote/
bash-4.3$
bash-4.3$ service docker start
bash-4.3$
Stopping the Docker Container and Service
If a specific container needs to be stopped, use the docker stop command, as shown in Example 7-34. To learn more Docker command options, use the docker –help and docker run –help commands.
When a specific container is stopped, all the applications, along with their packages and libraries, will cease to function, and any file system mounted will be unmounted.
Example 7-34 Stopping the Docker Container
bash-4.3$ docker ps
CONTAINER ID  IMAGE   COMMAND    CREATED        STATUS       PORTS  NAMES
0355f5ba1fd6  alpine  "/bin/sh"  36 minutes ago Up 13 minutes       myalpine2
bash-4.3$
bash-4.3$ docker stop 0355f5ba1fd6
0355f5ba1fd6
bash-4.3$
If a Docker service needs to be stopped altogether, follow the procedure as given in Example 7-35. As you have learned, if a Docker service is not up and running, containers will cease to exist in Nexus switches. Make sure to delete the dockerpart file from the active supervisor engine’s bootflash as well as the standby’s bootflash in applicable deployment scenarios.
Example 7-35 Stopping the Docker Service
bash-4.3$
bash-4.3$ service docker stop
Stopping dockerd: dockerd shutdown
bash-4.3$
bash-4.3$ service docker status
dockerd is stopped
bash-4.3$ exit
N9K-C93180YC#
N9K-C93180YC# delete bootflash:dockerpart
Do you want to delete "/dockerpart" ? (yes/no/abort) y
N9K-C93180YC#
Orchestrating Docker Containers Using Kubernetes
Kubernetes is an open-source platform for automating, deploying, scaling, and operating containers. Kubernetes was first created by Google and then donated to Cloud Native Compute Foundation (open source). Since Kubernetes became open source, there have been several projects to increase its scope and improve it to enable networking, storage, and more, which allows users to focus on developing and testing applications rather than spending resources to gain expertise in and maintain container infrastructure.
Kubernetes Architecture
Following is a brief discussion on the Kubernetes architecture, which will help you follow the procedures and examples provided later.
In a Kubernetes (or K8s) cluster functionally, there are two major blocks—Master and Node—as illustrated in Figure 7-8.
)
Figure 7-8 Kubernetes Architecture
Master components provide the cluster’s control plane. Master components make global decisions about the cluster (for example, scheduling) and detect and respond to cluster events (for example, starting up a new pod). Master components are kube-apiserver, etcd, kube-scheduler, kube-controller-manager, and cloud-controller-manager. Master components can be run on any machine in the cluster, and it is highly recommended that you have all master components running in the same machine, where no containers are instantiated.
Node components run on every host or a virtual machine, maintaining pods deployed and providing the Kubernetes runtime environment. Node components are kubelet, kube-proxy, and container runtime.
The Cloud controller manager is a daemon that has the cloud-specific control loops. The Kubernetes controller manager is a daemon that has the core control loops. In K8s, a controller is a control loop that monitors the state of the cluster through the API server and makes necessary changes to move the current state toward the desired state. Examples of controllers that ship with Kubernetes are the replication controller, endpoints controller, namespace controller, and service accounts controller.
You will take a quick look at the common terminologies used in the Docker containers and Kubernetes world.
Pod
A pod is a group of containers sharing resources such as volumes, file systems, storage, and networks. It also is a specification on how these containers are run and operated. In a simple view, a pod is synonymous to an application-centric logical host, which contains one or more tightly coupled containers. In a given pod, the containers share an IP address and Layer 4 port space and can communicate with each other using standard interprocess communication.
Controllers
Kubernetes contains many higher-level abstractions called controllers. Controllers build upon the basic objects and provide additional functionality and convenience features, such as ReplicaSet, StatefulSet, and DaemonSet.
The objective of a ReplicaSet is to maintain a set of replica pods running at any given time, guaranteeing the availability of a specified number of identical pods.
StatefulSet is the workload API object used to manage stateful applications. It manages the deployment and scaling of a set of pods and guarantees the ordering and uniqueness of these pods.
A DaemonSet is an object that ensures that all or some of the nodes run a copy of a pod. As a cluster expands by adding more nodes, DaemonSet makes sure that pods are added to the new added nodes. When nodes are removed from the cluster, those pods are removed, and the garbage is collected.
If you need more information on Kubernetes, please see the Kubernetes page at https://kubernetes.io/.
Building Kubernetes Master
You are going to build a K8s Master in an Ubuntu server, as shown in Example 7-36.
A K8s Master can be run natively in a Linux environment such as Ubuntu. But for convenience, you will run the K8s Master as a Docker container. The command provided in the example enables the Docker service to prepare the Ubuntu server for running Kubernetes Master components. Note that the following example uses Kubernetes version 1.2.2.
Example 7-36 Building K8s Master—Docker Service
root@Ubuntu-Server1$
root@Ubuntu-Server1$ service docker start
root@Ubuntu-Server1$
root@Ubuntu-Server1$ service docker status
dockerd (pid  17362) is running…
root@Ubuntu-Server1$
etcd is a highly available database of the K8s Master, which has all cluster data in a key-value pair format. As shown in Example 7-37, the docker run command starts the etcd component. The IP address and TCP port it is listening to are 10.0.0.6 and 4001, respectively.
Example 7-37 Building K8s Master—etcd
root@Ubuntu-Server1$ docker run -d --net=host gcr.io/google_containers/etcd:2.2.1 /usr/local/bin/etcd --listen-client-urls=http://10.0.0.6:4001 --advertise-client-urls=http://10.0.0.6:4001 --data-dir=/var/etcd/data
As you notice in Example 7-38, the K8s Master components API server is started, and it is listening to the same IP address and TCP port as etcd.
Example 7-38 Building K8s Master—API Server
root@Ubuntu-Server1$ docker run -d --name=api --net=host --pid=host --privileged=true gcr.io/google_containers/hyperkrs/hyperkubeube:v1.2.2 /hyperkube apiserver --insecure-bind-address=10.0.0.6 --allow-privileged=true --service-cluster-ip-range=172.16.1.0/24 --etcd_servers=http://10.0.0.6:4001 --v=2
The next step is to start the kubelet of the K8s Master components. The kubelet is listening to the same IP address as the etcd or the API server, but the TCP port is 8080. Please follow the steps provided in Example 7-39 to start the kubelet.
Example 7-39 Building K8s Master—Kubelet
root@Ubuntu-Server1$ docker run -d --name=kubs --volume=/:/rootfs:ro --volume=/sys:/sys:ro --volume=/dev:/dev --volume=/var/lib/docker/:/var/lib/docker:rw --volume=/var/lib/kubelet/:/var/lib/kubelet:rw --volume=/var/run:/var/run:rw --net=host --pid=host --privileged=true gcr.io/google_containers/hyperkube:v1.2.2 /hyperkube kubelet --allow-privileged=true --hostname-override="10.0.0.6" --address="10.0.0.6 --api-servers=http://10.0.0.6:8080 --cluster_dns=10.0.0.10 --cluster_domain=cluster.local --config=/etc/kubernetes/manifests-multi
The last step you need to do in the Master is to enable kube-proxy. It is a network proxy that runs on each node in your cluster, and it maintains the network rules on nodes. These network rules allow network communication to your pods from network sessions inside or outside your cluster. kube-proxy uses the operating system packet filtering layer if it is available. Enable kube-proxy as shown in Example 7-40.
Example 7-40 Building K8s Master—Kube Proxy
root@Ubuntu-Server1$ docker run -d --name=proxy --net=host –privileged gcr.io/
  google_containers/hyperkube:v1.2.2/hyperkube proxy --master=http://10.0.0.6:8080
  --v=2
Figure 7-9 illustrates the K8s Master running in an Ubuntu server and various components in the K8s Master.
)
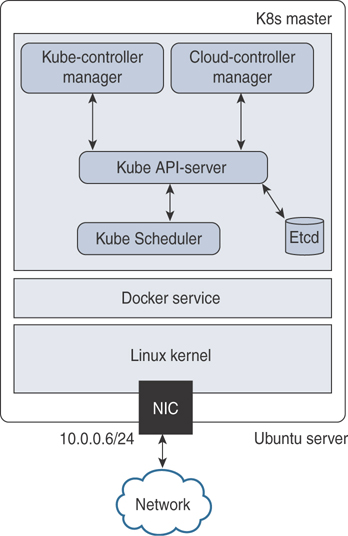
Figure 7-9 Kubernetes Master—Ubuntu Server
Now that you have a K8s Master service running, register Nexus 9000 as a node to the K8s Master. As you see in Example 7-41, the docker run commands register to the Master and the socket to which the kube-apiserver and other Master components are listening.
Example 7-41 Register Nexus Switch as K8s Node to Master
N9K-C93180YC# run bash
bash-4.3$
bash-4.3$ docker run -d --name=kubs --net=host --pid=host --privileged=true
  --volume=/:/rootfs:ro --volume=/sys:/sys:ro --volume=/dev:/dev --volume=/var/
  lib/docker/:/var/lib/docker:rw --volume=/var/lib/kubelet/:/var/lib/kubelet:rw
  --volume=/var/run:/var/run:rw \ gcr.io/google_containers/hyperkube:v1.2.2/
  hyperkube kubelet –allow-privileged=true --containerized --enable-server
  --cluster_dns=10.0.0.10 \--cluster_domain=cluster.local --config=/etc/
  kubernetes/manifests-multi \--hostname-override="10.0.0.6" --address=0.0.0.0
  --api-servers=http://10.0.0.6:4001
bash-4.3$
bash-4.3$ docker run  --name=proxy \--net=host --privileged=true gcr.io/google_
  containers/hyperkube:v1.2.2 /hyperkube proxy --master=http://10.0.0.6:4001 --v=2
bash-4.3$
Once the Nexus 9000 successfully registers as a K8s Node to the Master, it should begin to communicate with the Master. Figure 7-10 shows a Kubernetes Cluster, with an Ubuntu server acting as a K8s Master and a Nexus 9000 acting as a K8s Node.
)
Figure 7-10 Kubernetes Cluster
The certificate exchange must happen between the Master and Node to establish a secure connection between them, so all the data and control message communication happens securely.
Orchestrating Docker Containers in a Node from the K8s Master
Now you will look into orchestration of Docker containers in a pod from the K8s Master and how you can manage them through their lifecycles. Kubectl is a critical component in managing and orchestrating containers.
Kubectl is a set of CLI commands to manage Kubernetes clusters. It can deploy applications and inspect and manage cluster resources, among other tasks.
Download and install kubectl packages in an Ubuntu server in which you have already instantiated the K8s Master. Example 7-42 shows using the curl command to download a specific version—in this case, it is v1.15.2. If you want to download a different version, replace v1.15.2 with the preferred version.
Example 7-42 Install Kubectl in K8s Master
root@Ubuntu-Server1$ curl -o ~/.bin/kubectl http://storage.googleapis.com/
  kubernetes-release/release/v1.15.2/bin/linux/amd64/kubectl
root@Ubuntu-Server1$
Change the permissions to make the binary executable, and move it into the executable path, as shown in Example 7-43.
Example 7-43 Make Kubectl Executable
root@Ubuntu-Server1$ chmod u+x ./kubectl
root@Ubuntu-Server1$ mv ./kubectl /usr/local/bin/kubectl
By default, kubectl configuration is located in the ~/.kube/config file. For kubectl to discover and access a Kubernetes cluster, it looks for the kubeconfig file in the ~/.kube directory, which is created automatically when your cluster is created.
This kubeconfig file organizes information about clusters, users, namespaces, and authentication mechanisms. The kubectl command uses kubeconfig files to find the information it needs to choose a cluster and communicate with the API server of a cluster. If required, you can use the –kubeconfig flag to specify other kubeconfig files.
To learn how to install kubectl on different operating systems like Microsoft Windows or Apple macOS, please refer to the Install and Setup Kubectl Guide provided in the References section. Table 7-6 shows the kubectl syntax for common operations with examples, such as apply, get, describe, and delete. Note that the filenames used in the following table are for illustrative purposes only.
Table 7-6 Kubectl Operations and Commands
Operations |
Commands |
Create a service using the definition in the example-service.yaml file |
kubectl apply -f example-service.yaml |
Create a replication controller using the definition in a YAML file |
kubectl apply -f example-controller.yaml |
Create the objects that are defined in any .yaml, .yml, or .json files in a specific directory |
kubectl apply -f <directory> |
List all pods in plain-text output format |
kubectl get pods <pod-name> |
Get a list of all pods in plain-text output format and include additional information (node name, etc.) |
kubectl get pods -o wide |
Get a list of pods sorted by name |
kubectl get pods --sort-by=.metadata.name |
Get a list of all pods running on node by name |
kubectl get pods --field-selector=spec.nodeName=<node-name> |
Display the details of the node with node name |
kubectl describe nodes <node-name> |
Display the details of the pod with pod name |
kubectl describe pods/<pod-name> |
Delete a pod using the label |
Kubectl delete pods -l name=<label> |
Delete a pod using the type and name specified in a YAML file |
kubectl delete -f pod.yaml |
Delete all pods—initialized as well as uninitialized ones |
kubectl delete pods –all |
For details about each operation command, including all the supported flags and subcommands, see the Kubectl Overview document provided in the “References” section.
Now that you have learned about kubectl, you will see how to use it to manage clusters and nodes. In this case, the Kubernetes clusters have the Ubuntu server as K8s Master, the Nexus 9000 as Node, and an application named Alpine deployed. Example 7-44 shows kubectl commands to get the nodes, deployment, and pods from the K8s Master. The command results indicate that an application is running as container myalpine in the K8s pods.
Example 7-44 Use Kubectl to Get Nodes, Deployments, and Pods
root@Ubuntu-Server1$
root@Ubuntu-Server1$ kubectl get nodes
NAME             STATUS   ROLES    AGE    VERSION
Ubuntu-Server1   Ready    master   11m    v1.2.2
N9K-C93180YC     Ready    <none>   18m    v1.2.2
root@Ubuntu-Server1$
root@Ubuntu-Server1$ kubectl get deployments
NAME             READY   UP-TO-DATE   AVAILABLE   AGE
alpine           1/1     1            1           16m
root@Ubuntu-Server1$
root@Ubuntu-Server1$ kubectl get pods
NAME             READY   STATUS       RESTARTS    AGE
myalpine         1/1     RUNNING      0           12m
root@Ubuntu-Server1$
If you need to delete a specific container, you can orchestrate it from the Master using the command given in Example 7-45. If the pod is using labels, it can also be deleted using the kubectl delete pods -l command, as provided in Table 7-6.
Example 7-45 Use Kubectl to Delete Nodes, Deployments, and Pods
root@Ubuntu-Server1$
root@Ubuntu-Server1$ kubectl delete pods myalpine
pod "myalpine" deleted
root@Ubuntu-Server1$
root@Ubuntu-Server1$ kubectl get pods myalpine
Error from server (NotFound): pods "myalpine" not found
root@Ubuntu-Server1$
root@Ubuntu-Server1$ kubectl delete deployments alpine
deployment.extensios "alpine" deleted
root@Ubuntu-Server1$
root@Ubuntu-Server1$ kubectl get deployments
Error from server (NotFound): deployment.extensions "alpine" not found
root@Ubuntu-Server1$
To automate the instantiation, management, and deletion of pods and deployments, kubectl supports YAML, which plays a key role in deploying either a single instance of the objects or at scale. Chapter 8, “Application Developers’ Tools and Resources,” discusses the usage of JSON/XML and YAML.
Open Agent Container (OAC)
To support network device automation and management, Nexus switches can be enabled with Puppet and Chef agents. However, open agents cannot be directly installed on these platforms. To support these agents and similar applications, an isolated execution space within an LXC called the OAC was built.
As you see in Figure 7-11, the Open Agent Container (OAC) application is packaged into an .ova image and hosted at the same location where NX-OS images are published on Cisco.com.
)
Figure 7-11 Open Agent Container OVA Download
First copy the .ova image to the Nexus switch. In Example 7-46, the file is copied to the bootflash file system in a Nexus 7700 switch.
OAC Deployment Model and Workflow
To install and activate OAC on your device, use the commands shown in Example 7-46. The virtual-service install command creates a virtual service instance, extracts the .ova file, validates the contents packaged into the file, validates the virtual machine definition, creates a virtual environment in the device, and instantiates a container.
Example 7-46 Install OAC
Nexus7700# virtual-service install name oac package bootflash:oac.8.3.1.ova
Note: Installing package 'bootflash:/oac.8.3.1.ova' for virtual service 'oac'. Once
  the install has finished, the VM may be activated. Use 'show virtual-service list'
  for progress
Nexus7000#
2019 Aug 28 10:22:59 Nexus7700 %VMAN-2-INSTALL_FAILURE: Virtual Service
  [oac]::Install::Unpacking error::Unsupported OVA Compression/Packing format
2019 Aug 28 11:20:27 Nexus7700 %VMAN-5-PACKAGE_SIGNING_LEVEL_ON_INSTALL: Pack-
  age 'oac.8.3.1.ova' for service container 'oac' is 'Cisco signed', signing level
  allowed is 'Cisco signed'
2019 Aug 28 11:20:30 Nexus7700 %VMAN-2-INSTALL_STATE: Successfully installed virtual
  service 'oac'
Nexus7700#
Nexus7700# show virtual-service list
Virtual Service List:
Name                    Status             Package Name
----------------------------------------------------------
oac                     Installed          oac.8.3.1.ova
Nexus7700#
Using the show virtual-service list command, you can check the status of the container and make sure the installation is successful and the status is reported as installed. Then follow the steps given in Example 7-47 to activate the container. The NX-API feature is enabled, which will be used by OAC to perform the NX-OS CLIs directly from the container. As you see in the example, once the OAC is activated successfully, the show virtual-service list command shows the status of the container as activating and then activated.
Example 7-47 Activate OAC
Nexus7700# configure terminal
Nexus7700(config)# feature nxapi
Nexus7700(config)# virtual-service oac
Nexus7700(config-virt-serv)# activate
Nexus7700(config-virt-serv)# end

Note: Activating virtual-service 'oac', this might take a few minutes. Use 'show
  virtual-service list' for progress.
Nexus7700#
Nexus7700# show virtual-service list
Virtual Service List:
Name                    Status             Package Name
oac                     Activating         oac.8.3.1.ova
Nexus7700#
2019 Aug 28 11:23:06 Nexus7000 %$ VDC-1 %$ %VMAN-2-ACTIVATION_STATE: Successfully
  activated virtual service 'oac'
Nexus7700#
Nexus7700# show virtual-service list
Virtual Service List:
Name                    Status             Package Name
oac                     Activated          oac.8.3.1.ova
Nexus7700#
Nexus7700# 2019 Aug 28 11:23:06 Nexus7000 %$ VDC-1 %$ %VMAN-2-ACTIVATION_STATE:
  Successfully activated virtual service 'oac'
As shown in Example 7-48, you can verify that the OAC is instantiated and actively running on the device with the show virtual-service detail command. The command supplies details of the resources allocated to the container, such as disk space, CPU, and memory.
Example 7-48 Verify OAC Installation and Activation
Nexus7000# show virtual-service detail
Virtual service oac detail
  State                 : Activated
  Package information
    Name                : oac.8.3.1.ova
    Path                : bootflash:/oac.8.3.1.ova
    Application
      Name              : OpenAgentContainer
      Installed version : 1.0
      Description       : Cisco Systems Open Agent Container
    Signing
      Key type          : Cisco release key
      Method            : SHA1
    Licensing
      Name              : None
      Version           : None
  Resource reservation
    Disk                : 500 MB
    Memory              : 384 MB
    CPU                 : 1% system CPU

  Attached devices
    Type              Name        Alias
    ---------------------------------------------
    Disk              _rootfs
    Disk              /cisco/core
    Serial/shell
    Serial/aux
    Serial/Syslog                 serial2
    Serial/Trace                  serial3
Successful OAC activation depends on the availability of the required resources for OAC. If a failure occurs, the output of the show virtual-service list command will show the status as Activate Failed (see Example 7-49).
Example 7-49 OAC Activation Failure
Nexus7700# show virtual-service list
 Virtual Service List:
 Name                   Status             Package Name
 -----------------------------------------------------------------------
 oac                    Activate Failed    oac.8.3.1.ova
Nexus7700#
To obtain additional information on the failure, you can use the show system internal virtual-service event-history debug command. As shown in Example 7-50, the reason for failure is clearly reported as insufficient disk space.
Example 7-50 System Internal Event History
Nexus7700# show system internal virtual-service event-history debug
243) Event:E_VMAN_MSG, length:124, at 47795 usecs after Wed Aug 28 09:23:52 2019
  (info): Response handle (nil), string Disk storage request (500 MB) exceeds
  remaining disk space (344 MB) on storage
244) Event:E_VMAN_MSG, length:74, at 47763 usecs after Wed Aug 28 09:23:52 2019
  (debug): Sending Response Message: Virtual-instance: oac - Response: FAIL
Instantiation of the OAC is persistent across the reload of the switch or supervisor engine. It means that the OAC will be instantiated upon supervisor engine reset or reload, but it will not be activated. It is not necessary to save the configurations with “copy running-config startup-config” to have the OAC instantiated and activated, without manual intervention, upon supervisor engine reset or reload. Because the OAC does not have high-availability support, the instantiation of the OAC is not replicated automatically to the standby supervisor engine. In other words, if you need to have OAC instantiated and activated for switchover, copy and save either the same .ova file or a different file in the standby supervisor engine’s bootflash.
Accessing OAC via the Console
To connect to the virtual service environment from the host Nexus switch, use the virtual-service connect command, as shown in Example 7-51.
Example 7-51 Accessing OAC via the Console
Nexus7700# virtual-service connect name oac console
Connecting to virtual-service.  Exit using ^c^c^c
Trying 127.1.1.3...
Connected to 127.1.1.3.
Escape character is '^]'.
CentOS release 6.9 (Final)
Kernel 3.14.39ltsi+ on an x86_64

Nexus7700 login:
Password:
You are required to change your password immediately (root enforced)
Changing password for root.
(current) UNIX password:
New password:
Retype new password:
[root@Nexus7700 ~]#
[root@Nexus7700 ~]#whoami
root
[root@Nexus7700 ~]#
The default credentials to attach to the containers’ console are root/oac or oac/oac. You must change the root password upon logging in. Just like in any other Linux environment, you can use Sudo to root after logging in as user oac.
Because you are accessing through console needs, you need to be on the switch first. The access can be slow, so many users prefer to access OAC via SSH. Before OAC can be accessed via SSH, the SSH service should be enabled and the container networking set up. The following section tells you how to enable this access method.
OAC Networking Setup and Verification
By default, networking in the OAC is done in the default routing table instance. Any additional route that is required (for example, a default route) must be configured natively in the host device and should not be configured in the container.
As you can see in Example 7-52, the chvrf management command is used to access a different routing instance (for example, the management VRF). After logging in to the container through the console, enable SSH process/daemon (sshd) in the management VRF.
Every VRF in the system has a numerical value assigned to it, so you need to make sure the sshd context matches the number assigned to the management VRF to confirm that the SSH process is active on the right VRF context. As shown in Example 7-52, the number assigned to VRF management is 2, which matches with the DCOS_CONTEXT assigned to the SSHD process.
Example 7-52 Verify Container Networking
[root@Nexus7700 ~]# chvrf management
[root@Nexus7700 ~]#
[root@Nexus7700 ~]# getvrf
management
[root@Nexus7700 ~]#
[root@Nexus7700 ~]# /etc/init.d/sshd start
Starting sshd:
[  OK  ]
[root@Nexus7700 ~]#
[root@Nexus7700 ~]# more /etc/init.d/sshd | grep DCOS
export DCOS_CONTEXT=2
[root@Nexus7700 ~]#
[root@Nexus7700 ~]# vrf2num management
2
[root@Nexus7700 ~]# /etc/init.d/sshd status
openssh-daemon (pid 315) is running…
[root@Nexus7700 ~]#
Because NX-OS has allocated TCP port number 22 to the SSH process running in the host, configure an unused and different TCP port number for the OAC’s SSH daemon. As demonstrated in Example 7-53, the /etc/sshd_config file has been edited to assign Port 2222 to OAC’s SSH service, and the SSH service is listening for connections at 10.122.140.94, which is the Mgmt0 interface of the Nexus switch.
Example 7-53 Configure TCP Port for SSH
[root@Nexus7700 ~]# cat /etc/ssh/sshd_config
<snip>
Port 2222
#AddressFamily any
ListenAddress 10.122.140.94
#ListenAddress ::
<snip>
[root@Nexus7700 ~]#

 [root@Nexus7700 ~]#
Make sure to configure the DNS server and domain information so that OAC and agents installed in it can resolve domain names, as shown in Example 7-54.
Example 7-54 Verify DNS Configuration
[root@Nexus7700 ~]#
[root@Nexus7700 ~]# cat /etc/resolv.conf
nameserver 208.67.222.222
nameserver 208.67.220.220
[root@Nexus7700 ~]#
The command shown in Example 7-55 is performed in the host device, which confirms that a socket is open for OAC for the SSH connections at the IP address of the management port and TCP port 2222.
Example 7-55 Verify Open Sockets
Nexus7700# show sockets connection
Total number of netstack tcp sockets: 5
Active connections (including servers)
        Protocol State/       Recv-Q/   Local Address(port)/
                 Context      Send-Q    Remote Address(port)
<snip>
[slxc]: tcp      LISTEN       0         10.122.140.94(2222)
                 default      0         *(*)
<snip>
Nexus7700#
Access the container to verify SSH accessibility, as shown in Example 7-56.
Example 7-56 Verify SSH Access for OAC
Ubuntu-Server1$
Ubuntu-Server1$ ssh -p 2222 root@10.122.140.94
CentOS release 6.9 (Final)
Kernel 3.14.39ltsi+ on an x86_64

Nexus7700 login: root
Password:
Last login: Tue Sep 10 10:26:46 on pts/0
#
If you are making changes to SSH parameters and settings in OAC, it is recommended that you restart the SSH service and check the status with service sshd commands. Now you have an active OAC that can be accessed via console or SSH. Next you will learn how the kernel and OAC handles the packet from and to the front-panel ports in the host device, as illustrated in Figure 7-12.
)
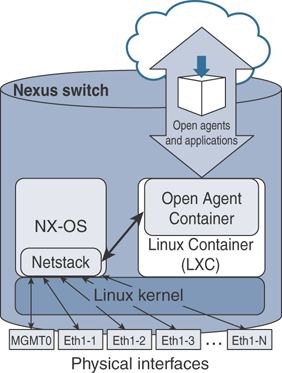
Figure 7-12 Packet Handling in OAC
As far as the containers are concerned, it all comes back to its namespace and the sockets and file descriptors associated to each container.
Once a socket is listening on a port, the kernel tracks those structures by namespace. As a result, the kernel knows how to direct traffic to the correct container socket. Here is a brief look at how traffic received by a Nexus switch’s front-panel port is forwarded to a specific container:
OAC implements a Message Transmission Service (MTS) tunnel to redirect container IP traffic to an NX-OS Netstack for forwarding lookup and packet processing to the front-panel port. This requires libmts and libns extensions, which are already included and set up in the oac.ova. Nexus 7000 has Netstack, which is a complete IP stack implementation in the user space of NX-OS. Netstack handles any traffic sent to the CPU for software processing.
The modified stack looks for the DCOS_CONTEXT environment variable, as mentioned in Example 7-56, to tag the correct VRF ID before sending the MTS message to Netstack.
The OAC is VDC aware because the implementation forwards traffic to the correct Netstack instance in which the OAC is installed.
Example 7-56 helped you verify that the OAC is accessible through SSH from an external device. In other words, the container should also be able to connect to the external network. Verify the reachability to the external network by sending ICMP pings to an external device, as shown in Example 7-57.
Example 7-57 OAC Reachability to External Network
[root@Nexus7700 ~]# chvrf management ping 10.122.140.65
PING 10.122.140.65 (10.122.140.65): 56 data bytes
64 bytes from 10.122.140.65: icmp_seq=0 ttl=254 time=2.495 ms
64 bytes from 10.122.140.65: icmp_seq=1 ttl=254 time=3.083 ms
64 bytes from 10.122.140.65: icmp_seq=2 ttl=254 time=2.394 ms^C
--- 10.122.140.65 ping statistics ---
3 packets transmitted, 3 packets received, 0.0% packet loss
round-trip min/avg/max/stddev = 1.221/2.444/3.962/1.138 ms
[root@Nexus7700 ~]#
From within the OAC, in addition to accessing the network, the network administrator can access the device CLI using the dohost command, access the Cisco NX-API infrastructure, and more importantly, install and run Python scripts as well as 32-bit Linux applications.
Management and Orchestration of OAC
If there is a new version of OVA available for OAC, you can upgrade the currently active container using virtual-service commands, as shown in the following example. To upgrade, you need to deactivate the currently active container, as shown in Example 7-58.
Example 7-58 Upgrade OAC
Nexus7700(config)# virtual-service oac
Nexus7700(config-virt-serv)# no activate
Nexus7700(config-virt-serv)# end
2019 Sep  9 22:46:46 N77-A-Admin %$ VDC-1 %$ %VMAN-2-ACTIVATION_STATE: Successfully
  deactivated virtual service 'oac'
Nexus7700#
Nexus7700# show virtual-service list
Virtual Service List:
Name                    Status             Package Name
-----------------------------------------------------------------------
oac                     Deactivated        oac.8.3.1.ova
Nexus7700#
Nexus7700# virtual-serv install name oac package bootflash:oac.8.3.1-v2.ova
Nexus7700#
Nexus7700# show virtual-service list
Virtual Service List:
Name                    Status             Package Name
----------------------------------------------------------
oac                     Installed          oac.8.3.1-v2.ova
Nexus7700#
Nexus7700# config t
Nexus7700(config)# feature nxapi
Nexus7700(config)# virtual-service oac
Nexus7700(config-virt-serv)# activate
Nexus7700(config-virt-serv)# end
Nexus7700# show virtual-service list
Virtual Service List:
Name                    Status             Package Name
----------------------------------------------------------
oac                     Activated          oac.8.3.1-v2.ova
Nexus7700#
To deactivate the container and uninstall the package, follow the steps as depicted in Example 7-59.
Example 7-59 Deactivate OAC
Nexus7700#
Nexus7700# config t
Nexus7700(config)# virtual-service oac
Nexus7700(config-virt-serv)# no activate
Nexus7700(config-virt-serv)# end
Nexus7700# show virtual-service list
Virtual Service List:
Name                    Status               Package Name
----------------------------------------------------------
oac                     Deactivated          oac.8.3.1-v2.ova
Nexus7700#
Nexus7700# config t
Nexus7700(config)# no virtual service oac
Nexus7700(config)# exit
Nexus7700# virtual-service uninstall name oac
Installation and Verification of Applications
Open Agent Container, as the name suggests, is specifically developed to run open agents that cannot be natively run on NX-OS, such as Puppet agents and Chef agents.
Custom Python Application
To demonstrate the capability, you will look into a simple Python application. The Python file in Example 7-60 prints the system date and time every 10 seconds until the user stops the application by pressing Ctrl+C.
Example 7-60 OAC—Sample Python Application
[root@Nexus7700 ~]# more datetime.py

#!/usr/bin/python
import datetime
import time

while True:
    print("Time now is ... ")
    DateTime = datetime.datetime.now()
    print (str(DateTime))
    time.sleep(10)

[root@Nexus7700 ~]#
Check the file permissions and make sure the user root has permission to execute the file. Execute the Python file, as shown in Example 7-61.
Example 7-6 Run Python Application in OAC
[root@Nexus7700 ~]#
[root@Nexus7700 ~]# ls -l datetime.py
-rwxr--r-- 1 root root 194 Sep 10 23:16 datetime.py
[root@Nexus7700 ~]#
[root@Nexus7700 ~]# ./datetime.py
Time now is ...
2019-09-10 23:16:09.563576
Time now is ...
2019-09-10 23:16:19.573776
Time now is ...
2019-09-10 23:16:29.584028
^CTraceback (most recent call last):
  File "./ datetime.py", line 8, in <module>
    time.sleep(10)
KeyboardInterrupt
[root@Nexus7700 ~]#
Now that you know how to run a simple Python application in an OAC, you will see how to use Python APIs that are built-in and available in Nexus platforms. You can use these Python APIs to develop and run customized applications to monitor device health, track events, or generate alerts.
Application Using Python APIs
Cisco NX-OS has a built-in package providing API access to CLIs, both at the exec level as well as configuration commands, referred to as Python APIs. Example 7-62 is a simple Python script that leverages Python APIs that are natively available in the Nexus switches.
Example 7-62 Application Using Python APIs
[root@Nexus7700 ~]# more PY-API.py

#!/usr/bin/python
from cli import *
import json

print("STANDARD CLI OUTPUT ...")
print (cli('show interface brief'))

print("JSON FORMAT CLI OUTPUT ...")
print (clid('show interface brief'))

[root@Nexus7700 ~]#
Example 7-63 demonstrates the outputs generated by the application. As you notice, cli returns the raw format of the CLI results, including control and special characters. clid returns a dictionary of attribute names and values for the given CLI command.
Example 7-63 Run Python API Application in OAC
 [root@Nexus7700 ~]# ls -l PY-API.py
-rwxr--r-- 1 root root 194 Sep 10 23:37 PY-API.py
[root@N77-A-Admin ~]#
[root@N77-A-Admin ~]# ./PY-API.py
STANDARD CLI OUTPUT ...
---------------------------------------------------------------------
Port   VRF          Status IP Address                Speed    MTU
---------------------------------------------------------------------
mgmt0  --           up     10.122.140.94             1000     1500
JSON FORMAT CLI OUTPUT ...
{"TABLE_interface": {"ROW_interface": {"interface": "mgmt0", "state": "up", "ip_
  addr": "10.122.140.94", "speed": "1000", "mtu": "1500"}}}
[root@Nexus7700 ~]#
The dohost command in Example 7-64 is a Python wrapper script using NX-API functions and Linux domain sockets back to NX-OS. Using dohost capability, a user can perform show commands and configuration commands within the VDC in which the container is created.
Example 7-64 Run NX-OS CLIs in OAC with dohost
[root@N77-A-Admin ~]#
[root@N77-A-Admin ~]# dohost "show clock"
Time source is NTP
23:38:15.692 EST Tue Sep 10 2019
[root@N77-A-Admin ~]#
Package Management
As shown in Example 7-65, you can install packages in OAC using yum install <packagename> commands, just like in any CentOS Linux environment. Before installing packages, make sure to install them in the right VRF context. The namespace or VRF should have network connectivity and have the configurations required to resolve domain names.
Example 7-65 OAC Package Management
[root@Nexus7700 ~]# chvrf management yum install -y vim
Setting up Install Process
Resolving Dependencies
<snip>
Use yum repolist commands to verify the installed packages and repositories.
From OAC, you can run Open Agents, 32-bit Linux applications, and custom Python applications leveraging Python APIs, NX-APIs, or simple dohost commands to run CLIs and analyze the data. Chapter 9, “Container Deployment Use Cases,” will discuss the various use cases for packages and applications.
Summary
This chapter introduced the fundamentals of the NX-OS architecture—its key components and benefits. It presented the key built-in capabilities that enable application hosting and containers in Nexus switching platforms. It discussed various popular features such as Open Agent Containers (OAC), Guest Shell, Bash, and Docker containers—how to enable or instantiate them; how to configure them to communicate with external networks; how to enable console as well as SSH access; how to install simple Python or Python API-based applications and run those applications; how to instantiate Docker containers in supported platforms; and how to orchestrate them using Kubernetes.
Cisco NX-OS platforms have built-in capabilities helping developers deploy custom applications in the networking devices connected to the end hosts. These applications become more effective as they are brought closer to the data generated at the network edge, which can be processed in real time to gain insights. Above all, users can orchestrate and manage the lifecycle of containers and applications by activating or deactivating them, upgrading the applications or packages installed, and leveraging the abilities the platforms provide for automation and scalability.
References
Cisco Nexus 7000 series Switches–NX-OS Architecture and Features: https://www.cisco.com/c/en/us/products/collateral/switches/nexus-7000-series-switches/white_paper_c11-622511.html
Open NX-OS and Linux–Developer Guide: https://developer.cisco.com/docs/nx-os/
Cisco Nexus 9000 series Python SDK User Guide and API Reference: https://developer.cisco.com/docs/nx-os/#!cisco-nexus-9000-series-python-sdk-user-guide-and-api-reference
Docker Documentation: https://docs.docker.com/
Alpine Linux–Home Page: https://alpinelinux.org/
Musl libc–Home Page: http://musl.libc.org/
Busybox–Home Page: https://busybox.net/about.html
Install and Setup Kubectl Guide: https://kubernetes.io/docs/tasks/tools/install-kubectl/
Kubectl Overview: https://kubernetes.io/docs/reference/kubectl/overview/