Unified Fabric
This chapter covers the following topics:
- Unified Fabric overview
- Enabling technologies
- Nexus 5x00 Unified Fabric configuration
- Nexus 7000 Unified Fabric configuration
- Cisco MDS Unified Fabric configuration
The Nexus family of switches represents a revolutionary approach to I/O within the data center referred to as Unified Fabric.
Unified Fabric Overview
One of the biggest trends in data centers today is consolidation, which can mean many different things. In some cases, consolidation refers to a physical consolidation of data centers where dozens or even hundreds of data centers are geographically dispersed and consolidated into a smaller number of large data centers. Consolidation can also exist within a data center where a large number of underutilized physical servers are consolidated, usually by leveraging some type of virtualization technology, into a smaller number of physical servers. Although virtualization offers many benefits, including consolidation of processors, memory, and storage, little is done to consolidate the amount of adapters, cables, and ports within the data center. In most virtualization implementations, there is actually a requirement for more adapters, cables, and ports to achieve the dense I/O requirements associated with virtualization. Data centers today contain multiple network fabrics that require discreet connectivity components to each fabric.
I/O consolidation is a trend within data centers that refers to the capability to aggregate connectivity to multiple fabrics into a single or redundant pair of adapters, cables, and port. Although new technologies have emerged to enable this consolidation to occur, the concept is not new. Fibre Channel, iSCSI, Infiniband, and others were all introduced in an attempt to consolidate I/O. Although the merits or consolidation capabilities of each of these technologies might be open to debate, for one reason or another, all failed to reach mainstream adoption as the single fabric for all I/O requirements.
As a consolidation technology, Unified Fabric offers several benefits to customers, including
- Lower capital expenditures: Through the reduction of adapters, cables, and ports required within the infrastructure.
- Lower operational expenses: Through the reduction of adapters, cables, and ports drawing power within the data center.
- Reduced deployment cycles: Unified Fabric provides a wire-once model, in which all LAN, SAN, IPC, and management traffic is available to every server without requiring additional connectivity components.
- Higher availability: Quite simply, fewer adapters and ports means fewer components that could fail.
Enabling Technologies
Ethernet represents an ideal candidate for I/O consolidation. Ethernet is a well-understood and widely deployed medium that has taken on many consolidation efforts already. Ethernet has been used to consolidate other transport technologies such as FDDI, Token Ring, ATM, and Frame Relay networking technologies. It is agnostic from an upper layer perspective in that IP, IPX, AppleTalk, and others have used Ethernet as transport. More recently, Ethernet and IP have been used to consolidate voice and data networks. From a financial aspect, there is a tremendous investment in Ethernet that also must be taken into account.
For all the positive characteristics of Ethernet, there are several drawbacks of looking to Ethernet as an I/O consolidation technology. Ethernet has traditionally not been a lossless transport and relied on other protocols to guarantee delivery. In addition, a large portion of Ethernet networks range in speed from 100 Mbps to 1 Gbps and are not equipped to deal with the higher-bandwidth applications such as storage.
New hardware and technology standards are emerging that will enable Ethernet to overcome these limitations and become the leading candidate for consolidation.
10-Gigabit Ethernet
10-Gigabit Ethernet (10GbE) represents the next major speed transition for Ethernet technology. Like earlier transitions, 10GbE started as a technology reserved for backbone applications in the core of the network. New advances in optic and cabling technologies have made the price points for 10GbE attractive as a server access technology as well. The desire for 10GbE as a server access technology is driven by advances in computer technology in the way of multisocket/multicore, larger memory capacity, and virtualization technology. In some cases, 10GbE is a requirement simply for the amount of network throughput required for a device. In other cases, however, the economics associated with multiple 1-G ports versus a single 10GbE port might drive the consolidation alone. In addition, 10GbE becoming the de facto standard for LAN-on-motherboard implementations is driving this adoption.
In addition to enabling higher transmission speeds, current 10GbE offerings provide a suite of extensions to traditional Ethernet. These extensions are standardized within IEEE 802.1 Data Center Bridging. Data Center Bridging is an umbrella referring to a collection of specific standards within IEEE 802.1, which are as follows:
- Priority-based flow control (PFC; IEEE 802.1Qbb): One of the basic challenges associated with I/O consolidation is that different protocols place different requirements on the underlying transport. IP traffic is designed to operate in large wide area network (WAN) environments that are global in scale, and as such applies mechanisms at higher layers to account for packet loss, for example, Transmission Control Protocol (TCP). Because of the capabilities of the upper layer protocols, underlying transports can experience packet loss and in some cases even require some loss to operate in the most efficient manner. Storage area networks (SANs), on the other hand, are typically smaller in scale than WAN environments. These protocols typically provide no guaranteed delivery mechanisms within the protocol and instead rely solely on the underlying transport to be completely lossless. Ethernet networks traditionally do not provide this lossless behavior for a number of reasons including collisions, link errors, or most commonly congestion. Congestion can be avoided with the implementation of pause frames. When a receiving node begins to experience congestion, it transmits a pause frame to the transmitting station, notifying it to stop sending frames for a period of time. Although this link-level pause creates a lossless link, it does so at the expense of performance for protocols equipped to deal with it in a more elegant manner. PFC solves this problem by enabling a pause frame to be sent only for a given Class of Service (CoS) value. This per-priority pause enables LAN and SAN traffic to coexist on a single link between two devices.
- Enhanced transmission selection (ETS; IEEE 802.1Qaz): The move to multiple 1-Gbps connections is done primarily for two reasons:
- The aggregate throughput for a given connection exceeds 1 Gbps; this is straightforward but is not always the only reason that multiple 1-Gbps links are used.
- To provide a separation of traffic, guaranteeing that one class of traffic will not interfere with the functionality of other classes. ETS provides a way to allocate bandwidth for each traffic class across a shared link. Each class of traffic can be guaranteed some portion of the link, and if a particular class doesn’t use all the allocated bandwidth, that bandwidth can be shared with other classes.
- Congestion notification (IEEE 802.1Qau): Although PFC provides a mechanism for Ethernet to behave in a lossless manner, it is implemented on a hop-by-hop basis and provides no way for multihop implementations. 802.1Qau is currently proposed as a mechanism to provide end-to-end congestion management. Through the use of backward congestion notification (BCN) and quantized congestion notification (QCN), Ethernet networks can provide dynamic rate limiting similar to what TCP provides only at Layer 2.
- Data Center Bridging Capability Exchange Protocol extensions to LLDP (IEEE 802.1AB): To negotiate the extensions to Ethernet on a specific connection and to ensure backward compatibility with legacy Ethernet networks, a negotiation protocol is required. Data Center Bridging Capability Exchange (DCBX) represents an extension to the industry standard Link Layer Discovery Protocol (LLDP). Using DCBX, two network devices can negotiate the support for PFC, ETS, and Congestion Management.
Fibre Channel over Ethernet
Fibre Channel over Ethernet (FCoE) represents the latest in standards-based I/O consolidation technologies. FCoE was approved within the FC-BB-5 working group of INCITS (formerly ANSI) T11. The beauty of FCoE is in its simplicity. As the name implies, FCoE is a mechanism that takes Fibre Channel (FC) frames and encapsulates them into an Ethernet. This simplicity enables for the existing skillsets and tools to be leveraged while reaping the benefits of a Unified I/O for LAN and SAN traffic.
FCoE provides two protocols to achieve Unified I/O:
- FCoE: The data plane protocol that encapsulates FC frames into an Ethernet header.
- FCoE Initialization Protocol (FIP): A control plane protocol that manages the login/logout process to the FC fabric.
Figure 8-1 provides a visual representation of FCoE.
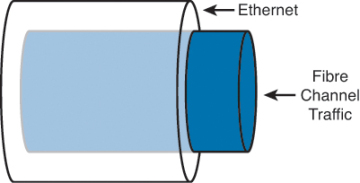
Figure 8-1. Fibre Channel over Ethernet
)
When Fibre Channel frames are encapsulated in an Ethernet, the entire Fibre Channel frame, including the original Fibre Channel header, payload, and CRC are encapsulated in an Ethernet. Figure 8-2 depicts this.
)
Figure 8-2. Fibre Channel Frame Encapsulated in an Ethernet
The ANSI T11 specifies the frame format for FCoE. It is a standard Ethernet frame with a new EtherType of 0x8906. Also note that the new Ethernet frame has a new Frame Check Sequence (FCS) created rather than using the FCS from the Fibre Channel frame. Figure 8-3 illustrates the FCoE frame format.
)
Figure 8-3. FcoE Frame Format
FCoE standards also define several new port types:
- Virtual N_Port (VN_Port): An N_Port that operates over an Ethernet link. N_Ports, also referred to as Node Ports, are the ports on hosts or storage arrays used to connect to the FC fabric.
- Virtual F_Port (VF_Port): An F_port that operates over an Ethernet link. F_Ports are switch or director ports that connect to a node.
- Virtual E_Port (VE_Port): An E_Port that operates over an Ethernet link. E_Ports or Expansion ports are used to connect Fibre Channel switches together; when two E_Ports are connected the link, it is an interswitch link (ISL).
To facilitate using FCoE an additional control plane protocol was needed and thus FCoE Initialization Protocol (FIP) was developed. FIP helps the FCoE perform VLAN discovery, assists the device in login (FLOGI) to the fabric, and finds key resources such as Fibre Channel Forwarders (FCFs). FIP is its own Ethertype (0x8914), which makes it easier to identify on a network and helps FIP Snooping devices identify FCoE traffic. Figure 8-4 depicts where FIP starts and ends and where FCoE takes over.
)
Figure 8-4. FIP Process
FIP can be leveraged by native FCoE-aware devices to help provide security against concerns such as spoofing MAC addresses of end nodes and helps simpler switches, such as FIP Snooping devices, learn about FCoE traffic. This awareness can provide security and QoS mechanisms that protect FCoE traffic from other Ethernet traffic and can help ensure a good experience with FCoE without the need to have a full FCoE stack on the switch. Currently the Nexus 4000 is the only Nexus device that supports FIP snooping.
Single-Hop Fibre Channel over Ethernet
Single-hop FCoE refers to an environment in which FCoE is enabled on one part of the network, frequently at the edge between the server and the directly connected network switch or fabric extender. In a single-hop topology the directly connected switch usually has native Fibre Channel ports which in turn uplink into an existing SAN, although you can have a complete network without any other fibre channel switches. Single-hop FCoE is the most commonly deployed FCoE model because of its double benefit of seamless interoperability into an existing SAN and the cost savings with a reduction in adapters, cabling, and optics to servers.
This reduction in cabling and adapters is accomplished through the use of a new adapter: Converged Network Adapter (CNA). CNAs have the capability to encapsulate Fibre Channel frames into Ethernet and use a 10GbE Ethernet interface to transmit both native Ethernet/IP traffic and storage traffic to the directly connected network switch or fabric extender. The CNA’s drivers dictate how it appears to the underlying operating system, but in most cases it appears as a separate Ethernet card and separate Fibre Channel Host Bus Adapter (HBA).
Figure 8-5 shows how a CNA appears in Device Manager of a Microsoft Windows Server.
)
Figure 8-5. CNA in Device Manager
Using CNAs in a server, a typical single-hop FCoE topology would look like Figure 8-6 where a server is connected to Nexus 5x00 switches via Ethernet interfaces. The Nexus 5x00 switches have both Ethernet and native Fibre Channel interfaces for connectivity to the rest of the network topology. The fibre channel interfaces connect to native fibre channel ports on the Cisco MDS switches, and the Ethernet interfaces connect to the Ethernet interfaces on the Nexus 7000 switches. The FCoE traffic is transported only across the first or single hop from the server to the network switch. The current implementation of the Cisco Unified Computing System (UCS) uses single-hop FCoE between the UCS blade servers and the UCS Fabric Interconnects.
)
Figure 8-6. Single-Hop FCoE Network Topology
Multhop Fibre Channel over Ethernet
Building on the implementations of single-hop FCoE, multihop FCoE topologies can be created. As illustrated in Figure 8-6, native fibre channel links exist between the Nexus 5x00 and the Cisco MDS Fibre Channel switches, whereas separate Ethernet links interconnect the Nexus 5x00 and Nexus 7000. With multihop FCoE, topologies can be created where the native fibre channel links are not needed, and both fibre channel and Ethernet traffic use Ethernet interfaces.
The benefit of multihop FCoE is to simplify the topology and reduce the number of native fibre channel ports required in the network as a whole. Multihop FCoE takes the same principles of encapsulating fibre channel frames in Ethernet and uses it for switch-to-switch connections, referred to as Inter-Switch Links (ISL) in the Fibre Channel world, and uses the VE port capability in the switches.
Figure 8-7 shows a multihop FCoE topology where the server connects via CNAs to Nexus 5x00s, which in turn connect to Nexus 7000 series switches via the Ethernet carrying FCoE. The storage array is directly connected to the Nexus 7000 via FCoE as well.
)
Figure 8-7. Multihop FCoE Topology
Storage VDC on Nexus 7000
One of the building blocks in a multihop FCoE topology is the storage Virtual Device Context (VDC) on the Nexus 7000. VDCs are discussed in detail in Chapter 1, “Introduction to Cisco NX-OS,” and the focus in this chapter is on the Storage VDC and its use in a multihop FCoE topology. VDC is a capability of the Nexus 7000 series switches that enables a network administrator to logically virtualize the Nexus 7000 into multiple logical devices. The storage VDC is a special VDC that enables the virtualization of storage resources on the switch. This enables in essence a “virtual MDS” inside the Nexus 7000 that participates fully in the FCoE network as a full fibre channel forwarder (FCF).
With a Storage VDC network, administrators can provide the storage team a context that allows the storage team to manage their own interfaces; configurations; and fibre channel-specific attributes such as zones, zonesets, and aliases. Figure 8-8 shows how a storage VDC can be implanted in an existing topology where single-hop FCoE was initially deployed and then multihop FCoE was added. The storage VDC was created with VE ports connecting downstream to the Nexus 7000 and VE port to the Cisco MDS fibre channel director.
)
Figure 8-8. Storage VDC on the Nexus 7000
The storage VDC has some requirements that are unique to this type of VDC as storage traffic is traversing it. The first requirement is that the storage VDC can support only interfaces hosted on the F1 or F2/F2e series of modules. These modules support the capability to provide lossless Ethernet and as such are only suitable for doing FCoE. The VDC allocation process in NX-OS does not allow for other types of modules to have interfaces in a VDC that has been defined as a storage VDC.
In addition to requiring F1 or F2/F2e series modules, the storage VDC cannot run nonstorage related protocols. You cannot enable features such as OSPF, vPC, PIM, or other Ethernet/IP protocols in the storage VDC. The only features allowed are directly related to storage. Finally, the default VDC cannot be configured as a storage VDC.
N-Port Virtualization
The fibre channel module of the Nexus 5x00 series switch can operate in two modes:
- Fabric
- NPV (N-Port Virtualization)
When in fabric mode, the switch module operates as any switch in a fibre channel network does.
Fabric mode switches have the following characteristics:
- Unique domain ID per virtual storage area network (VSAN)
- Participation in all domain services (zoning, fabric security, Fibre Channel Identification [FCID] allocation, and so on)
- Support for interoperability modes
When the fibre channel module is configured in NPV mode, it does not operate as a typical fibre channel switch; instead leveraging a service, NPIV, on the upstream or core fibre channel switch for domain services. The switch operates in a similar fashion as an NPIV-enabled host on the fabric. The advantage NPV provides the network administrator is the control of domain IDs and points of management on a fibre channel network as it scales.
Additional benefits of NPV include the capability to manage the fibre channel switch as a discrete entity for tasks such as software management and debugging the fibre channel network. NPV also enables network administrators to connect FCoE hosts to non–FCoE-enabled SANs and simplifies third-party interoperability concerns because the NPV enabled fibre channel module does not participate in domain operations or perform local switching. This enables multivendor topologies to be implemented without the restrictions the interoperability mode requires.
The fibre channel module in the Nexus 5x00 creates a new port type to the fibre channel network when in NPV mode: the NP-port. The NP-port proxies fabric login (FLOGI) requests from end stations and converts them to Fabric Discoveries (FDISC) dynamically and transparently to the end device. The result is that end systems see the NPV-enabled switch as a Fabric Port (F-port) and the upstream/core switch sees the NPV-enabled switch as an F-port as well. Figure 8-9 illustrates the port roles used in an NPV-enabled network.
)
Figure 8-9. Port Roles in an NPV-Enabled Network
N-Port Identification Virtualization
A key component to enable the proper operation of NPV is the need for N-Port Identification Virtualization (NPIV) on the core/upstream fibre channel switch. NPIV is an industry-standard technology defined by the T11 committee as part of the Fibre Channel Link Services (FC-LS) specification and enables multiple N Port IDs or FCIDs to share a single physical N Port. Prior to NPIV, it was not possible to have a system that used multiple logins per physical port—it was a one-login-to-one-port mapping. With the increasing adoption of technologies such as virtualization, the need to allow multiple logins was created. NPIV operates by using Fabric Discovery (FDISC) requests to obtain additional FCIDs.
FCoE NPV Mode
Building on Fibre Channel NPV mode, the Nexus 5x00 supports running in FCoE-NPV mode as well. FCoE-NPV brings similar benefits as the Fibre Channel NPV mode to a pure FCoE implementation. The switch still uses FIP snooping to determine FCoE traffic and to maintain separation and provide security with the benefits of minimized domain sprawl, simplified management, and fewer FCoE devices to manage. FCoE NPV also creates a new port type for the VNP (Virtual NPV Port). Figure 8-10 illustrates where the VNP port resides in an FCoE NPV topology.
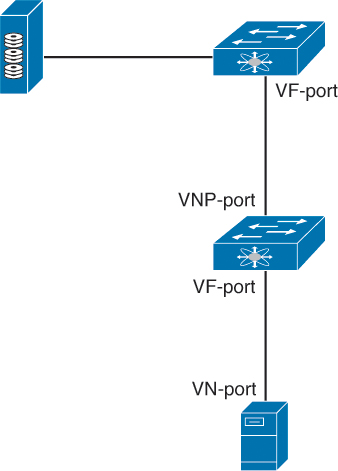
Figure 8-10. FCoE NPV Topology
Nexus 5x00 Unified Fabric Configuration
The Nexus 5x00 switches provide multiple options for using FCoE and have evolved since the platform was introduced in 2008. With the majority of Nexus 5x00 implementations used in the access layer of data center networks, it stands to reason that FCoE is predominant in the access layer. Nexus 5x00s can be used in single hop, multihop, and Fabric Extender (FEX)-based topologies using both native fibre channel interfaces, pure FCoE, or any combination. In addition, new features such as FCoE NPV and Enhanced vPC provide even more options for network administrators to choose from.
With the Nexus 5x00 switch, FCoE functionality is a licensed feature. After the license is installed, FCoE configuration can be completed.
Example 8-1 shows how to verify the installed licenses.
Example 8-1. Verifying FCoE License
N5K-1# show lic usa
Feature                      Ins  Lic   Status Expiry Date Comments
                                 Count
---------------------------------------------------------------------
FCOE_NPV_PKG                  No    -   Unused             -
FM_SERVER_PKG                 No    -   Unused             -
ENTERPRISE_PKG                Yes   -   Unused Never       -
FC_FEATURES_PKG               Yes   -   Unused Never       -
VMFEX_FEATURE_PKG             No    -   Unused             -
ENHANCED_LAYER2_PKG           No    -   Unused             -
---------------------------------------------------------------------
N5K-1#
Example 8-2 shows how to enable the FCoE feature.
Example 8-2. Enabling FCoE
N5K-1# config
Enter configuration commands, one per line.  End with CNTL/Z.
N5K-1(config)# feature fcoe
FC license checked out successfully
fc_plugin extracted successfully
FC plugin loaded successfully
FCoE manager enabled successfully
N5K-1(config)#
N5K-1(config)# show license usage
Feature                      Ins  Lic   Status Expiry Date Comments
                                 Count
---------------------------------------------------------------------
FCOE_NPV_PKG                  No    -   Unused             -
FM_SERVER_PKG                 No    -   Unused             -
ENTERPRISE_PKG                Yes   -   Unused Never       -
FC_FEATURES_PKG               Yes   -   In use Never       -
VMFEX_FEATURE_PKG             No    -   Unused             -
ENHANCED_LAYER2_PKG           No    -   Unused             -
---------------------------------------------------------------------
N5K-1(config)#
Enabling NPV mode requires a write erase and reboot, as demonstrated in Example 8-3.
Example 8-3. Enabling NPV Mode
N5K-1# config
Enter configuration commands, one per line.  End with CNTL/Z.
N5K-1(config)# show license usage
Feature                      Ins  Lic   Status Expiry Date Comments
                                 Count
---------------------------------------------------------------------
FCOE_NPV_PKG                  No    -   Unused             -
FM_SERVER_PKG                 No    -   Unused             -
ENTERPRISE_PKG                Yes   -   Unused Never       -
FC_FEATURES_PKG               Yes   -   In use Never       -
VMFEX_FEATURE_PKG             No    -   Unused             -
ENHANCED_LAYER2_PKG           No    -   Unused             -
---------------------------------------------------------------------

N5K-1(config)# feature npv
Verify that boot variables are set and the changes are saved.
Changing to npv mode erases the current configuration and reboots the
switch in npv mode. Do you want to continue? (y/n):y
Shutdown Ports..
 writing reset reason 90,
2012 Jul 30 00:32:39 N5K-1 %$ VDC-1 %$ Jul 30 00:32:39 %KERN-0-
SYSTEM_MSG: Shutdown Ports.. - kernel
2012 Jul 30 00:32:39 N5K-1 %$ VDC-1 %$ Jul 30 00:32:39 %KERN-0-
SYSTEM_MSG:  writINIT: Sending processes the TERM signal
Sending all processes the TERM signal...
Sending all processes the KILL signal...
Unmounting filesystems...
Restarting system.
Single-Hop FCoE Configuration: Nexus 5x00
Now that the switches are configured for FCoE and have NPV configured, the next step is to configure the interconnection between the upstream Fibre Channel switch and the Nexus 5x00. In this example, a Nexus 5010 is connected to a Cisco MDS 9500 Fibre Channel directory via a 4-Gb native Fibre Channel port.
The first step is to configure the MDS to use NPIV, configure the port, and add it to the correct VSAN. This enables the MDS to support multiple FLOGI on a physical interface (NPIV), and for good documentation a description is added to the physical interface before being enabled. Finally, the port is added to the correct VSAN, 10 in this example. Figure 8-11 shows the topology for this environment.
)
Figure 8-11. Single-Hop FCoE with Nexus 5x00
Example 8-4 shows how to configure the ISL between the MDS and the Nexus 5000.
Example 8-4. Configuring the MDS Port
CMHLAB-DC1-MDS1# config
CMHLAB-DC1-MDS1(config)# feature npiv
CMHLAB-DC1-MDS1(config)# interface fc3/4
CMHLAB-DC1-MDS1(config)# switchport description Connection to CMHLAB-DC1-TOR1 2/1
CMHLAB-DC1-MDS1(config)# switchport trunk mode off
CMHLAB-DC1-MDS1(config)# no shutdown
CMHLAB-DC1-MDS1(config)# vsan database
CMHLAB-DC1-MDS1(config-vsan-db)# vsan 10 interface fc3/4
CMHLAB-DC1-MDS1(config)# end
CMHLAB-DC1-MDS1#
CMHLAB-DC1-MDS1# show vsan membership interface fc3/4
fc3/4
        vsan:10
        allowed list:1-4078,4080-4093
CMHLAB-DC1-MDS1#
Next, the Nexus 5x00 needs to have a port configured for the connection to the MDS. The port is configured for the NP mode and added to the appropriate VSAN, 10 to match with the MDS configuration.
Example 8-5 shows how to configure the fibre channel uplink to the SAN core.
Example 8-5. Configuring FC Uplink
CMHLAB-DC1-TOR1# config
Enter configuration commands, one per line.  End with CNTL/Z.
CMHLAB-DC1-TOR1(config)# int fc2/1
CMHLAB-DC1-TOR1(config-if)# switchport mode NP
CMHLAB-DC1-TOR1(config-if)# switchport description Connection to CMHLAB-DC1-MDS1
fc3/4
CMHLAB-DC1-TOR1(config-if)# no shutdown
CMHLAB-DC1-TOR1(config-if)# end
CMHLAB-DC1-TOR1#

CMHLAB-DC1-TOR1# show int fc2/1
fc2/1 is up
    Port description is Connection to CMHLAB-DC1-MDS1 fc3/4
    Hardware is Fibre Channel, SFP is short wave laser w/o OFC (SN)
    Port WWN is 20:41:00:0d:ec:a3:0d:00
    Admin port mode is NP, trunk mode is off
    snmp link state traps are enabled
    Port mode is NP
    Port vsan is 10
    Speed is 4 Gbps
    Transmit B2B Credit is 16
    Receive B2B Credit is 16
    Receive data field Size is 2112
    Beacon is turned off
    1 minute input rate 0 bits/sec, 0 bytes/sec, 0 frames/sec
    1 minute output rate 0 bits/sec, 0 bytes/sec, 0 frames/sec
      10055 frames input, 5625012 bytes
        0 discards, 0 errors
        0 CRC,  0 unknown class
        0 too long, 0 too short
      10054 frames output, 523260 bytes
        0 discards, 0 errors
      1 input OLS, 1 LRR, 0 NOS, 0 loop inits
      1 output OLS, 1 LRR, 0 NOS, 0 loop inits
    last clearing of "show interface" counters never
      16 receive B2B credit remaining
      16 transmit B2B credit remaining
      0 low priority transmit B2B credit remaining
    Interface last changed at Mon May 21 20:09:15 2012


CMHLAB-DC1-TOR1# show npv sta

npiv is enabled

disruptive load balancing is disabled

External Interfaces:
====================
  Interface:  fc2/1, VSAN:   10, FCID: 0x7c0020, State: Up

  Number of External Interfaces: 1

Server Interfaces:
==================

  Number of Server Interfaces: 0

CMHLAB-DC1-TOR1#
After the connection between the MDS and Nexus 5x00 is configured, the next task is to configure the FCoE VLAN to VSAN mapping, configure the Ethernet interface that connects to the server, and finally configure the Virtual Fibre Channel (VFC) interface. This process is shown in Example 8-6 and Example 8-7.
Example 8-6. Configuring FCoE VLAN to VSAN Mapping
CMHLAB-DC1-TOR1# config
Enter configuration commands, one per line.  End with CNTL/Z.
CMHLAB-DC1-TOR1(config)# vlan 10
CMHLAB-DC1-TOR1(config-vlan)# fcoe vsan 10
CMHLAB-DC1-TOR1(config-vlan)# name FCOE-FabA
CMHLAB-DC1-TOR1(config-vlan)# end
CMHLAB-DC1-TOR1# show vlan fcoe

Original VLAN ID        Translated VSAN ID      Association State
----------------        ------------------      -----------------

      10                        10               Operational

CMHLAB-DC1-TOR1#
After the FCoE VLAN is configured and mapped to a fibre channel VSAN, the Ethernet port that connects to the server should be configured (refer to Example 8-7).
Example 8-7. Configuring the Physical and VFC Interface for FCoE
CMHLAB-DC1-TOR1# config
Enter configuration commands, one per line.  End with CNTL/Z.
CMHLAB-DC1-TOR1(config)# interface Ethernet1/7
CMHLAB-DC1-TOR1(config-if)# description Connection to DEMOLAB-VM1 - Emulex CNA
CMHLAB-DC1-TOR1(config-if)# switchport mode trunk
CMHLAB-DC1-TOR1(config-if)# switchport trunk allowed vlan 10,101,301,401,701,801
CMHLAB-DC1-TOR1(config-if)# interface vfc17
CMHLAB-DC1-TOR1(config-if)# bind interface Ethernet1/7
CMHLAB-DC1-TOR1(config-if)# switchport description FCoE Interface for DEMOLAB-VM1
CMHLAB-DC1-TOR1(config-if)# no shutdown
CMHLAB-DC1-TOR1(config-if)# end
CMHLAB-DC1-TOR1# CMHLAB-DC1-TOR1# show int e1/7 trunk

--------------------------------------------------------------------------------
Port          Native  Status        Port
              Vlan                  Channel
--------------------------------------------------------------------------------
Eth1/7        1       trunking      --

--------------------------------------------------------------------------------
Port          Vlans Allowed on Trunk
--------------------------------------------------------------------------------
Eth1/7        10,101,301,401,701,801

--------------------------------------------------------------------------------
Port          Vlans Err-disabled on Trunk
--------------------------------------------------------------------------------
Eth1/7        none

--------------------------------------------------------------------------------
Port          STP Forwarding
--------------------------------------------------------------------------------
Eth1/7        10,101,301,401,701,801

--------------------------------------------------------------------------------
Port          Vlans in spanning tree forwarding state and not pruned
--------------------------------------------------------------------------------
Eth1/7        --

--------------------------------------------------------------------------------
Port          Vlans Forwarding on FabricPath
--------------------------------------------------------------------------------
CMHLAB-DC1-TOR1# show int vfc17
vfc17 is up
    Bound interface is Ethernet1/7
    Port description is FCoE Interface for DEMOLAB-VM1
    Hardware is Ethernet
    Port WWN is 20:10:00:0d:ec:a3:0d:3f
    Admin port mode is F, trunk mode is on
    snmp link state traps are enabled
    Port vsan is 10
    1 minute input rate 0 bits/sec, 0 bytes/sec, 0 frames/sec
    1 minute output rate 0 bits/sec, 0 bytes/sec, 0 frames/sec
      0 frames input, 0 bytes
        0 discards, 0 errors
      0 frames output, 0 bytes
        0 discards, 0 errors
    last clearing of "show interface" counters never

CMHLAB-DC1-TOR1#
FCoE-NPV on Nexus 5x00
Configuration of the FCoE NPV mode on a Nexus 5x00 switch is similar to the configuration for the Fibre Channel NPV mode. The main difference is the configuration of an Ethernet port for the ISL and the VNP port. Figure 8-12 shows the topology used for the FCoE-NPV examples.
)
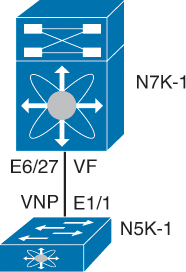
Figure 8-12. FCoE NPV Configuration Between a Nexus 5000 and Nexus 7000
First, the FCoE NPV feature must be enabled, as shown in Example 8-8.
Example 8-8. FCOE-NPV Feature Installation
N5K-1# config
Enter configuration commands, one per line.  End with CNTL/Z.
N5K-1(config)# feature fcoe-npv
FCoE NPV license checked out successfully
fc_plugin extracted successfully
FC plugin loaded successfully
FCoE manager enabled successfully
FCoE NPV enabled on all modules successfully
N5K-1(config)# end
N5K-1#
After the feature is installed, the switch needs to be configured for the VSAN and VLAN mapping to associate traffic in a VLAN to a VSAN, as shown in Example 8-9.
Example 8-9. VLAN to VSAN Mapping
N5K-1# config
Enter configuration commands, one per line.  End with CNTL/Z.
N5K-1(config)# vsan database
N5K-1(config-vsan-db)# vsan 2000 name FCOE
N5K-1(config-vsan-db)# vlan 2000
N5K-1(config-vlan)# fcoe vsan 2000
N5K-1(config-vlan)# end
N5K-1# show vlan fcoe

Original VLAN ID        Translated VSAN ID      Association State
----------------        ------------------      -----------------

      2000                      2000             Operational
N5K-1#
Next, the Ethernet interface and VFC interface need to be configured to carry the Ethernet VLAN and VNP mode. Example 8-10 reflects this process.
Example 8-10. VNP Port Configuration on the Nexus 5000
N5K-1# config
Enter configuration commands, one per line.  End with CNTL/Z.
N5K-1(config)# int e1/1
N5K-1(config-if)# switchport mode trunk
N5K-1(config-if)# switchport trunk allowed vlan 2000
N5K-1(config-if)# no shut
N5K-1(config-if)# desc FCoE-NPV Connection to N7K-1 E6/27
N5K-1(config-if)# interface vfc11
N5K-1(config-if)# desc FCoE-NPV Connection to N7K-1 vfc11
N5K-1(config-if)# switchport mode np
N5K-1(config-if)# bind interface e1/1
N5K-1(config-if)# switchport trunk allowed vsan 2000
N5K-1(config-if)# no shut
N5K-1(config-if)# end
N5K-1#N5K-1# show int vfc11
vfc11 is trunking
    Bound interface is Ethernet1/1
    Port description is FCoE-NPV Connection to N7K-1 vfc11
    Hardware is Ethernet
    Port WWN is 20:0a:00:05:73:d3:14:7f
    Admin port mode is NP, trunk mode is on
    snmp link state traps are enabled
    Port mode is TNP
    Port vsan is 1
    Trunk vsans (admin allowed and active) (2000)
    Trunk vsans (up)                       (2000)
    Trunk vsans (isolated)                 ()
    Trunk vsans (initializing)             ()
    1 minute input rate 0 bits/sec, 0 bytes/sec, 0 frames/sec
    1 minute output rate 0 bits/sec, 0 bytes/sec, 0 frames/sec
      10 frames input, 1140 bytes
        0 discards, 0 errors
      7 frames output, 980 bytes
        0 discards, 0 errors
    last clearing of "show interface" counters Mon Jul 30 17:21:52 2012

    Interface last changed at Mon Jul 30 17:21:52 2012


N5K-1#
A similar configuration must be applied on the Nexus 7000 side of the link. The primary difference is that the VFC is configured for the VF mode and NPIV is enabled. Example 8-11 shows the commands used for the configuration and the commands to verify the correct operation.
Example 8-11. VFC and Ethernet Port Configuration on the Nexus 7000
N7K-1-FCoE# config
Enter configuration commands, one per line.  End with CNTL/Z.
N7K-1-FCoE(config)# feature npiv
N7K-1-FCoE(config)# interface Ethernet6/27
N7K-1-FCoE(config-if)# description FCoE-NPV Connection to N5K-1 e1/1
N7K-1-FCoE(config-if)# switchport
N7K-1-FCoE(config-if)# switchport mode trunk
N7K-1-FCoE(config-if)# switchport trunk allowed vlan 2000
N7K-1-FCoE(config-if)# no shutdown
N7K-1-FCoE(config-if)#
N7K-1-FCoE(config-if)#interface vfc11
N7K-1-FCoE(config-if)#bind interface Ethernet6/27
N7K-1-FCoE(config-if)# switchport trunk allowed vsan 2000
N7K-1-FCoE(config-if)# no shutdown
N7K-1-FCoE(config-if)#end
N7K-1-FCoE#N7K09-FCoE# show int vfc11
vfc11 is trunking
    Bound interface is Ethernet6/27
    Hardware is Ethernet
    Port WWN is 20:0a:00:26:98:0f:d9:bf
    Admin port mode is F, trunk mode is on
    snmp link state traps are enabled
    Port mode is TF
    Port vsan is 1
    Speed is auto
    Trunk vsans (admin allowed and active) (2000)
    Trunk vsans (up)                       (2000)
    Trunk vsans (isolated)                 ()
    Trunk vsans (initializing)             ()
    7 fcoe in packets
    868 fcoe in octets
    11 fcoe out packets
    1324 fcoe out octets
    Interface last changed at Mon Jul 30 17:44:30 2012

N7K01-FCoE# show fcns data

VSAN 2000:
--------------------------------------------------------------------------
FCID        TYPE  PWWN                    (VENDOR)        FC4-TYPE:FEATURE
--------------------------------------------------------------------------
0x010000    N     20:0a:00:05:73:d3:14:7f (Cisco)         npv

Total number of entries = 1
N7K-1-FCoE#
Nexus 7000 Unified Fabric Configuration
The Nexus 7000 provides director class support for FCoE solutions and can be used in both core and edge topologies. The platforms provides the high-availability features and capabilities such as redundant supervisors, redundant hardware components, and the inherent availability components of NX-OS, such as Storage VDCs. In-Service Software Upgrade (ISSU), Stateful Switch Over (SSO) and stateful process restart make for a solid foundation.
FCoE on the Nexus 7000 is available on the F1 (N7K-F132XP-15) and F2/F2e (N7K-F248XP-25) modules. When using FCoE on the F2/F2e module, a Supervisor 2 or Supervisor 2E must be used. FCoE on F2/F2e cannot work with a Supervisor 1 module. FCoE is also a licensed feature, and the license is bound to a module, so if FCoE will be used across multiple modules in a chassis, there must be an FCoE license installed per module.
With these requirements met, FCoE can be installed on the Nexus 7000. FCoE installation requires the system QoS policy is configured to a template that provides a no-drop class. This is configured in either the default VDC or the admin VDC if running NX_OS 6.1(1) or later. The default QoS policy uses eight drop classes and is named default-np-8e-policy. Example 8-12 shows the QoS classes available to be selected and shows the change to a single no-drop class. This policy matches FCoE traffic in CoS 3 and provides a lossless Ethernet transport (no drop).
Example 8-12. Setting the System QoS Policy
N7K-1# config
Enter configuration commands, one per line.  End with CNTL/Z.
N7K-1(config)# system qos
N7K-1(config-sys-qos)# service-policy type network-qos ?
  default-nq-4e-policy  Default 4-ethernet policy (4-drop 4-nodrop CoS)
  default-nq-6e-policy  Default 6-ethernet policy (6-drop 2-nodrop CoS)
  default-nq-7e-policy  Default 7-ethernet policy (7-drop 1-nodrop CoS)
  default-nq-8e-policy  Default 8-ethernet policy (8-drop CoS)
N7K-1(config-sys-qos)# service-policy type network-qos default-nq-7e-policy
N7K-1(config-sys-qos)# end
N7K-1# show policy-map system type network-qos

  Type network-qos policy-maps
  ============================
  policy-map type network-qos default-nq-7e-policy
    class type network-qos c-nq-7e-drop
      match cos 0-2,4-7
      congestion-control tail-drop
      mtu 1500
    class type network-qos c-nq-7e-ndrop-fcoe
      match cos 3
      match protocol fcoe
      pause
      mtu 2112

N7K-1#
With the QoS policy mapped to a no-drop policy, the next step is to install the FCoE feature set and configure a Storage VDC. This enables FCoE across the entire chassis and then creates a VDC to be used for storage functions. Example 8-13 describes this process.
Example 8-13. Installing FCoE Feature Set and Creating a Storage VDC
N7K-1# config
Enter configuration commands, one per line.  End with CNTL/Z.
N7K-1(config)# install feature-set fcoe
N7K-1(config)# vdc FCoE type storage
Note:  Creating VDC, one moment please ...
N7K-1(config-vdc)# show vdc

vdc_id  vdc_name   state    mac               type         lc
------- --------   -----    ---               ----         --
1       N7K-1      active  00:26:98:0f:d9:c1  Admin       None
2       Agg1       active  00:26:98:0f:d9:c2  Ethernet    f2
3       Core1      active  00:26:98:0f:d9:c3  Ethernet    m1 f1 m1xl m2xl
4       Access1    active  00:26:98:0f:d9:c4  Ethernet    m1 f1 m1xl m2xl
5       FCoE       active  00:26:98:0f:d9:c5  Storage     f1 f2


N7K-1(config-vdc)# show vdc FCoE detail

vdc id: 5
vdc name: FCoE
vdc state: active
vdc mac address: 00:26:98:0f:d9:c5
vdc ha policy: RESTART
vdc dual-sup ha policy: SWITCHOVER
vdc boot Order: 1
CPU Share: 5
CPU Share Percentage: 16%
vdc create time: Tue Jul 31 00:15:39 2012
vdc reload count: 0
vdc restart count: 0
vdc type: Storage
vdc supported linecards: f1 f2

N7K-1(config-vdc)#
The next step is to configure the storage VDC by allocating ports from modules, allocating a range of VLANs for use with FCoE, and then setting up the VDC for FCoE usage. Because this VDC is new, the switch prompts for a few items such as system password strength, password, and to run the setup script. When completed, basic FCoE configuration can begin. Example 8-14 walks through this process.
Example 8-14. Allocation of Ports and Initial VDC Configuration
N7K-1# config
Enter configuration commands, one per line.  End with CNTL/Z.
N7K-1(config)# vdc fcoe
N7K-1(config-vdc)# allocate interface e6/17,e6/27,e6/29-32
Entire port-group is not present in the command. Missing ports will be included
automatically
Moving ports will cause all config associated to them in source vdc to be removed.
Are you sure you want to move the ports (y/n)?  [yes] yes
N7K-1(config-vdc)# allocate fcoe-vlan-range 2000 from vdc Access1
N7K-1(config-vdc)# end
N7K-1#
N7K-1# switchto vdc fcoe


         ---- System Admin Account Setup ----


Do you want to enforce secure password standard (yes/no) [y]: n

  Enter the password for "admin":
  Confirm the password for "admin":

         ---- Basic System Configuration Dialog VDC: 5 ----

This setup utility will guide you through the basic configuration of
the system. Setup configures only enough connectivity for management
of the system.

Please register Cisco Nexus7000 Family devices promptly with your
supplier. Failure to register may affect response times for initial
service calls. Nexus7000 devices must be registered to receive
entitled support services.

Press Enter at anytime to skip a dialog. Use ctrl-c at anytime
to skip the remaining dialogs.

Would you like to enter the basic configuration dialog (yes/no): no
Cisco Nexus Operating System (NX-OS) Software
TAC support: http://www.cisco.com/tac
Copyright (c) 2002-2012, Cisco Systems, Inc. All rights reserved.
The copyrights to certain works contained in this software are
owned by other third parties and used and distributed under
license. Certain components of this software are licensed under
the GNU General Public License (GPL) version 2.0 or the GNU
Lesser General Public License (LGPL) Version 2.1. A copy of each
such license is available at
http://www.opensource.org/licenses/gpl-2.0.php and
http://www.opensource.org/licenses/lgpl-2.1.php
N7K-1-FCoE#
N7K-1-FCoE# config
Enter configuration commands, one per line.  End with CNTL/Z.
N7K-1-FCoE(config)# feature-set fcoe
N7K-1-FCoE(config)# feature npiv
N7K-1-FCoE(config)# feature lldp
N7K-1-FCoE(config)# vsan database
N7K-1-FCoE(config-vsan-db)# vsan 2000
N7K-1-FCoE(config-vsan-db)# vlan 2000
N7K-1-FCoE(config-vlan)# fcoe
N7K-1-FCoE(config-vlan)# end
N7K-1-FCoE(config)# end
N7K-1-FCoE#
N7K-1-FCoE# show vlan fcoe

Original VLAN ID        Translated VSAN ID      Association State
----------------        ------------------      -----------------

      2000                      2000             Operational
N7K-1-FCoE#
N7K-1-FCoE(config)# end
N7K-1-FCoE#
With the foundation for FCoE configured, the next step is to provision connectivity. Figure 8-13 shows the topology the following examples use.
)
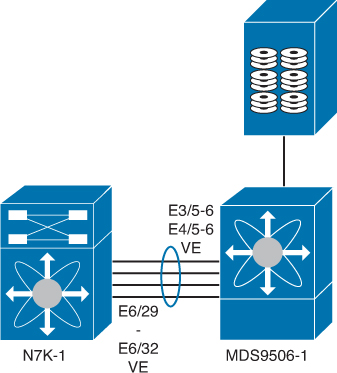
Figure 8-13. FCoE Topology Between Nexus 7000 and MDS
The first step is to configure the Ethernet interfaces, add them to a port channel for additional bandwidth on the ISL and redundancy, and then configure the VFC, as shown in Example 8-15.
Example 8-15. Nexus 7000 to MDS Interconnection
N7K-1-FCoE# config
Enter configuration commands, one per line.  End with CNTL/Z.
N7K-1-FCoE(config)# feature lacp
N7K-1-FCoE(config)# int e6/29-32
N7K-1-FCoE(config-if-range)# channel-group 258 mode active
N7K-1-FCoE(config-if-range)# int po258
N7K-1-FCoE(config-if)# desc Port Channel to MDS9506-1
N7K-1-FCoE(config-if)# switchport mode trunk
N7K-1-FCoE(config-if)# switchport trunk allowed vlan 2000
N7K-1-FCoE(config-if)# no shut
N7K-1-FCoE(config-if)# int vfc 101
N7K-1-FCoE(config-if)# switchport desc VE Port Channel to MDS9506-1
N7K-1-FCoE(config-if)# switch mode e
N7K-1-FCoE(config-if)# switch trunk allowed vsan 2000
N7K-1-FCoE(config-if)# bind interface po258
N7K-1-FCoE(config-if)# no shut
N7K-1-FCoE(config-if)# end
N7K-1-FCoE# show int vfc101
vfc101 is trunking
    Bound interface is port-channel258
    Port description is VE Port Channel to MDS9506-1
    Hardware is Ethernet
    Port WWN is 20:64:00:26:98:0f:d9:bf
    Admin port mode is E, trunk mode is on
    snmp link state traps are enabled
    Port mode is TE
    Port vsan is 1
    Speed is 40 Gbps
    Trunk vsans (admin allowed and active) (2000)
    Trunk vsans (up)                       (2000)
    Trunk vsans (isolated)                 ()
    Trunk vsans (initializing)             ()
    120677 fcoe in packets
    13910628 fcoe in octets
    120679 fcoe out packets
    10352660 fcoe out octets
    Interface last changed at Tue Jul 31 01:21:17 2012


N7K-1-FCoE#
For reference, Example 8-16 shows the corresponding configuration on the MDS.
Example 8-16. MDS FCoE Configuration
MDS9506-1# show run int Eth3/5, Eth3/6, Eth4/5, Eth4/6

!Command: show running-config interface Ethernet3/5-6, Ethernet4/5-6
!Time: Tue Jul 31 01:30:57 2012

version 5.2(2a)

interface Ethernet3/5
  switchport mode trunk
  switchport trunk allowed vlan 2000
  channel-group 258 mode active
  no shutdown

interface Ethernet3/6
  switchport mode trunk
  switchport trunk allowed vlan 2000
  channel-group 258 mode active
  no shutdown

interface Ethernet4/5
  switchport mode trunk
  switchport trunk allowed vlan 2000
  channel-group 258 mode active
  no shutdown

interface Ethernet4/6
  switchport mode trunk
  switchport trunk allowed vlan 2000
  channel-group 258 mode active
  no shutdown

MDS9506-1#
MDS9506-1# show run int epo258

!Command: show running-config interface ethernet-port-channel258
!Time: Tue Jul 31 01:31:42 2012

version 5.2(2a)

interface ethernet-port-channel258
  switchport mode trunk
  switchport trunk allowed vlan 2000

Invalid interface format at '^' marker.
MDS9506-1# show run int vfc101

!Command: show running-config interface vfc101
!Time: Tue Jul 31 01:31:52 2012

version 5.2(2a)

interface vfc101
  bind interface ethernet-port-channel258
  switchport mode E
  switchport trunk allowed vsan 2000
  no shutdown

MDS9506-1# MDS9506-1# show int vfc101
vfc101 is trunking
    Bound interface is ethernet-port-channel258
    Hardware is Ethernet
    Port WWN is 20:64:00:0d:ec:35:1e:ff
    Admin port mode is E, trunk mode is on
    snmp link state traps are enabled
    Port mode is TE
    Port vsan is 1
    Speed is 40 Gbps
    Trunk vsans (admin allowed and active) (2000)
    Trunk vsans (up)                       (2000)
    Trunk vsans (isolated)                 ()
    Trunk vsans (initializing)             ()
    117696 fcoe in packets
    10091312 fcoe in octets
    117695 fcoe out packets
    13575440 fcoe out octets
    Interface last changed at Tue Jul 31 01:17:09 2012


MDS9506-1#
FCoE on the Nexus 7000 also supports a unique capability that enables interfaces to be shared between two VDCs. This enables the Nexus 7000 to be used in the access layer of networks where servers connect to the switch and use FCoE. A shared interface enables FCoE traffic to be segmented into the Storage VDC at the edge of the network. When an interface is shared between two VDCs, a few rules must be followed:
- Interfaces can be shared only between one Ethernet VDC and one Storage VDC.
- Interfaces to be shared must be configured as 802.1Q trunks in the Ethernet VDC.
- Interfaces may be shared only from the Ethernet VDC that allocated VLANs to the Storage VDC.
- The Ethernet VDC “owns” the physical interface. If the interface is admin down in the Ethernet VDC, it will be admin down in the Storage VDC.
- All ports that have a common ASIC must be allocated as shared interfaces. This is done in groups of two on the F1 modules and groups of four on F2/F2e modules.
In Example 8-17, four ports are configured as trunks in the Ethernet VDC and then configured for shared interfaces in the Storage VDC.
Example 8-17. Nexus 7000 Shared Interface Allocation
N7K-1# config
Enter configuration commands, one per line.  End with CNTL/Z.
N7K-1(config)# vdc fcoe
N7K-1(config-vdc)# allocate shared interface e6/17
Entire port-group is not present in the command. Missing ports will be included
automatically
Ports that share the port group of the interfaces you have specified will be affected
as well. Continue (y/n)? [yes] yes
N7K-1(config-vdc)# end
N7K-1# fcoe
Cisco Nexus Operating System (NX-OS) Software
TAC support: http://www.cisco.com/tac
Copyright (c) 2002-2012, Cisco Systems, Inc. All rights reserved.
The copyrights to certain works contained in this software are
owned by other third parties and used and distributed under
license. Certain components of this software are licensed under
the GNU General Public License (GPL) version 2.0 or the GNU
Lesser General Public License (LGPL) Version 2.1. A copy of each
such license is available at
http://www.opensource.org/licenses/gpl-2.0.php and
http://www.opensource.org/licenses/lgpl-2.1.php
N7K-1-FCoE# show int brief

-------------------------------------------------------------------------------
Interface                Status                            Speed
                                                           (Gbps)
-------------------------------------------------------------------------------
sup-fc0                  up                                1

--------------------------------------------------------------------------------
Ethernet      VLAN    Type Mode   Status  Reason                   Speed     Por
t
Interface                                                                    Ch
#
--------------------------------------------------------------------------------
Eth6/17       1       eth  trunk  down    Administratively down      auto(D) --
Eth6/18       1       eth  trunk  down    Administratively down      auto(D) --
Eth6/19       1       eth  trunk  down    Administratively down      auto(D) --
Eth6/20       1       eth  trunk  down    Administratively down      auto(D) --
Eth6/25       --      eth  routed down    Administratively down      auto(D) --
Eth6/26       --      eth  routed down    Administratively down      auto(D) --
Eth6/27       --      eth  routed down    Administratively down      auto(D) --
Eth6/28       --      eth  routed down    SFP not inserted           auto(D) --
Eth6/29       1       eth  trunk  up      none                        10G(D) 258
Eth6/30       1       eth  trunk  up      none                        10G(D) 258
N7K-1-FCoE#
The next step required is to create the VFC interface for the host and specify the shared interface as the binding. This is the same syntax used on the Nexus 5x00 earlier in the chapter. Example 8-18 shows the process for the topology shown in Figure 8-14.
)
Figure 8-14. FCoE Topology
Example 8-18. Nexus 7000 VFC Interface Creation
N7K-1-FCoE# config
Enter configuration commands, one per line.  End with CNTL/Z.
N7K-1-FCoE(config)# int vfc617
N7K-1-FCoE(config-if)# bind interface ethernet 6/17
N7K-1-FCoE(config-if)# no shut
N7K-1-FCoE(config-if)# end
N7K-1-FCoE#
With the VFCs created and bound, VEs created to the MDS, and both storage and hosts connected to the fabric, the last step would be to configure zoning and device aliasing for the FC network. The Nexus switches can participate in zoning with a Fibre Channel network.
Example 8-19 shows a device-alias, zone and zoneset creation, and activation.
Example 8-19. Device alias, zone, and zoneset Creation and Activation
N7K-1-FCoE# config
Enter configuration commands, one per line.  End with CNTL/Z.
N7K-1-FCoE(config)# device-alias mode enhanced
N7K-1-FCoE(config)# device-alias database
N7K-1-FCoE(config-device-alias-db)#   device-alias name C210-ESX1 pwwn
20:00:e8:b7:48:4d:74:22
N7K-1-FCoE(config-device-alias-db)#   device-alias name NetApp_FAS270 pwwn
50:0a:09:81:85:75:90:88
N7K-1-FCoE(config-device-alias-db)# device-alias commit
N7K-1-FCoE(config-device-alias-db)# exit
N7K-1-FCoE(config)# zone name NetappArray vsan 2000
N7K-1-FCoE(config-zone)# member device-alias NetApp_FAS270
N7K-1-FCoE(config-zone)# member device-alias C210-ESX1
N7K-1-FCoE(config-zone)# zone name C210-ESX1 vsan 2000
N7K-1-FCoE(config-zone)# member device-alias C210-ESX1
N7K-1-FCoE(config-zone)# zoneset name VSAN2000_ZS vsan 2000
N7K-1-FCoE(config-zoneset)# member NetappArray
N7K-1-FCoE(config-zoneset)# member C210-ESX1
N7K-1-FCoE(config-zoneset)# exit
N7K-1-FCoE(config)# zoneset activate name VSAN2000_ZS vsan 2000
N7K-1-FCoE(config)# end
N7K-1-FCoE#
Summary
Unified Fabric offers several benefits to customers, including
- Lower capital expenditures: Through the reduction of adapters, cables, and ports required within the infrastructure.
- Lower operational expenses: Through the reduction of adapters, cables, and ports drawing power within the data center.
- Reduced deployment cycles: Provides a wire-once model, where all LAN, SAN, IPC, and management traffic is available to every server without requiring additional connectivity components.
- Higher availability: Few adapters and fewer ports means fewer components that could fail.
By taking advantage of enhancements to traditional Ethernet technologies, and the emergence of technologies such as FCoE, customers can realize these benefits with minimal disruption to operational models. This chapter showed the basic Nexus 5x00 and Nexus 7000 configurations necessary to provide a Unified access method for LAN data traffic and SAN storage traffic. The multiple technologies that can be used with Unified Fabric such as NPV, NPIV FCOE-NPV, Storage VDCs, and shared interfaces were illustrated, and various use cases were discussed.